Home

This platform is a fully featured platform offering Social Media Marketing, Landing Pages, CRM, Drip Marketing, Email Marketing, Autoresponders, Reporting and Analytics and much more. All the essentials you need in one simple, powerful and affordable solution.

How it works

The user dashboard has Social Media, Landing Pages, Lead Management, CRM, Email Marketing and Autoresponders along with user settings to allow small to medium business to undertake basic inbound marketing for their website.

Authentication

Sign In

Signing into the platform is easy, simply click on the "Sign In" button in the top right of the platform website http://www.the platform.com, or navigate to the login page directly at http://dashboard.the platform.com

  1. Select your preferred language
  2. Enter your Username selected on sign up
  3. Enter your Password
  4. Click the green button with the "Tick"

Sign Out

  1. When logged in to your dashboard click on your name in the top right hand corner
  2. Select the bottom menu item "Sign Out"

You will be returned to the login page where you can re-login if desired.

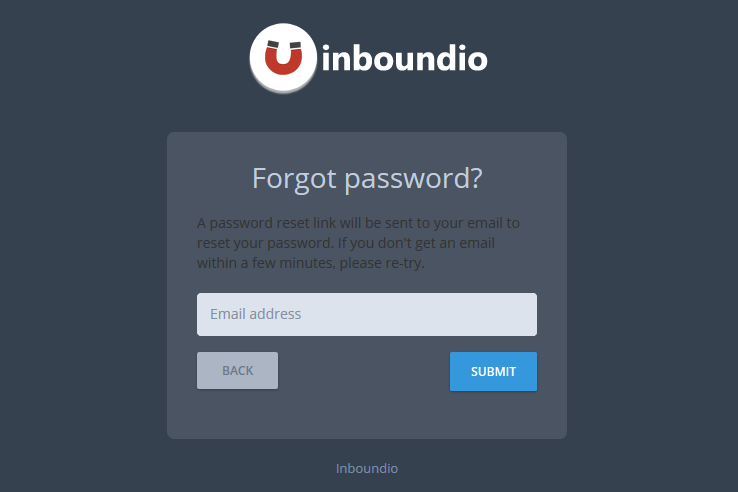
Forgot Password

If you have forgotten your password you can reset your password through the following method:

  1. Go to the dashboard sign in screen
  2. Click the "Forgot Password?" link in the bottom right
  3. Enter your email address
  4. TO DO

Profile & Accounts

User Profile

Your user profile contains information about your login, contact information, time zone, preferred language and the ability to disable your user account

  1. To access your user profile, when logged in to your dashboard click on your name in the top right hand corner
  2. Select "Profile" from the drop down menu

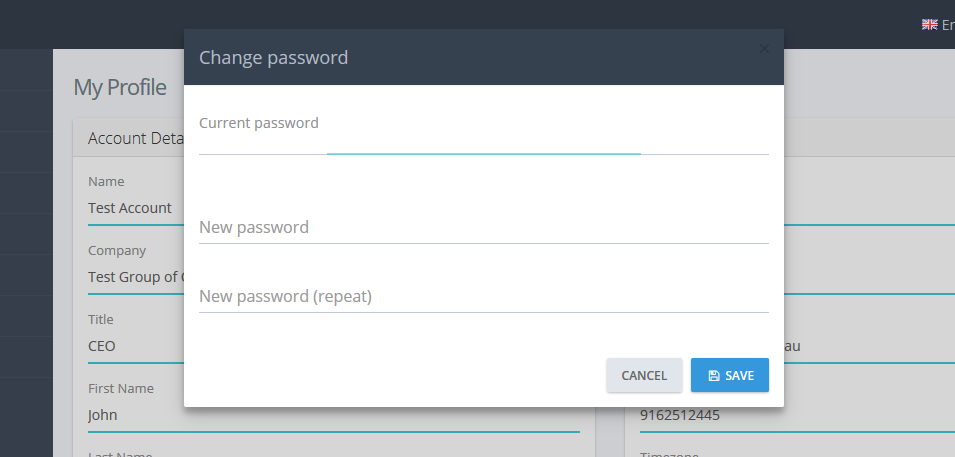
Change Password

Changing your password when logged in is completed through your user profile. If you have forgotten your password and are unable to login user the forgot password facility on the login screen

To change your password:

  1. login to the platform and click on your name in the top right hand corner
  2. Select "Profile" from the drop down menu
  3. Enter your new password in the Password & Password Confirmation fields
  4. Click the "Update" button.

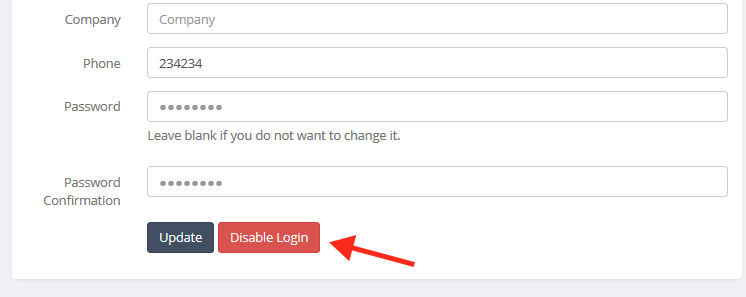
Disable User / Disable Login

If for some reason you need to disable your own login to the platform this can be achieve be clicking the disable login button from the "Profile" area. Disabling your login will not cancel your subscription it will only disable your login from being able to access the platform.

To fully cancel your subscription see Cancel Subscription

To disable your login:

  1. login to the platform and click on your name in the top right hand corner
  2. Select "Profile" from the drop down menu
  3. Click the "Disable Login" button
  4. Press "OK" to confirm your account should be disabled.

My Subscription

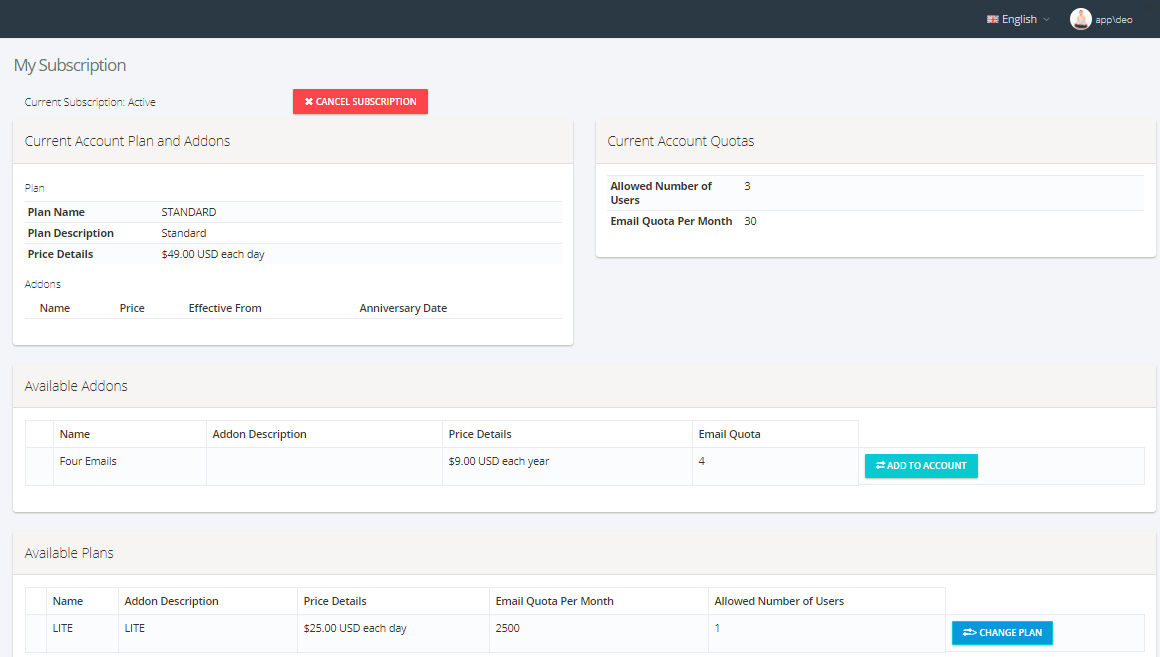
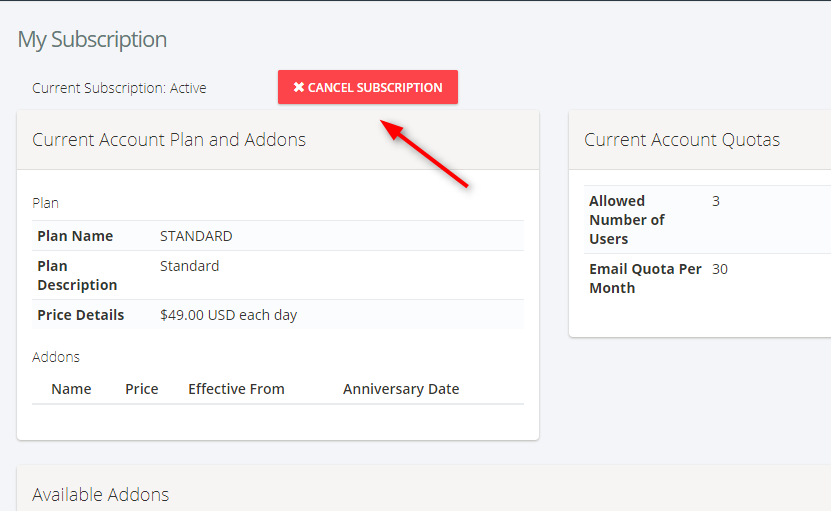
The My Subscription area allow you to view your current subscription plan and cancel your subscription to the platform

  1. To access your subscription, when logged in to your dashboard click on your name in the top right hand corner
  2. Select "My Subscription" from the drop down menu

Cancel Subscription

We will be sad to see you leave, but if you want to cancel your subscription with the platform you can achieve this through the My Subscription area.

  1. To cancel your subscription, when logged in to your dashboard click on your name in the top right hand corner
  2. Select "My Subscription" from the drop down menu
  3. Click the cancel subscription button and confirm your cancellation.

Note: This will cancel the use of the platform as your subscription has been cancelled however if you log in again you can reactivate your subscription at a later date.

User Dashboard

Basic Analytics

The dashboard providers a number of basic analytics to allow you to monitor common metrics from your inbound marketing efforts. The basic analytics shows:

  • Email - how many times an email is opened
  • Landing Pages - how many times a landing page is viewed
  • Social - how often a post is liked or shared
  • Contacts - how many contacts have been added.

Landing Page Lead Data

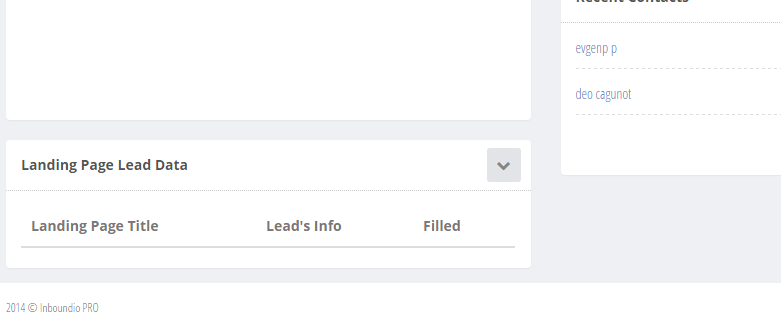
The landing page lead data grid provides you with usage details of your landing pages including:

  • The landing page title
  • The contact/lead name
  • The date the information was captured

Email Limits

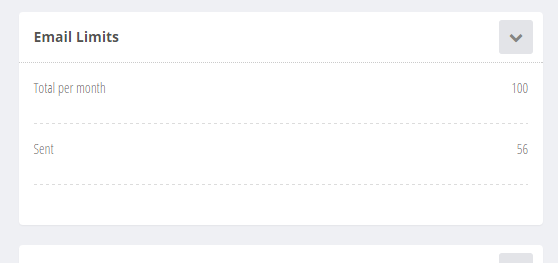
Each subscription plan has administrator defined limits for email sending per month. The email limits area provides an up to date snapshot of your email limits and usage in the currently monthly cycle.

Landing Page Clicks

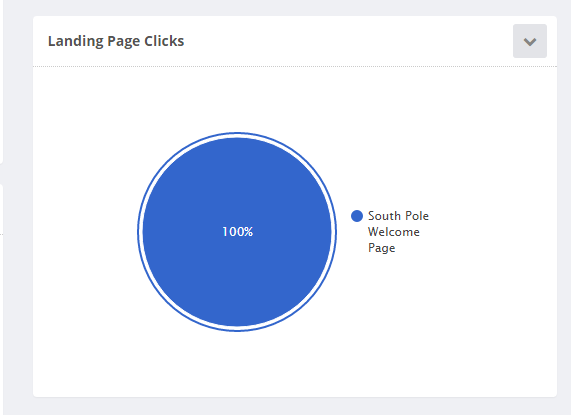
The landing page clicks chart shows you your most effective landing pages and the amount of clicks they have received as a percentage of your total landing page usage. This can allow you to see which landing pages are converting and being accessed and which ones aren't

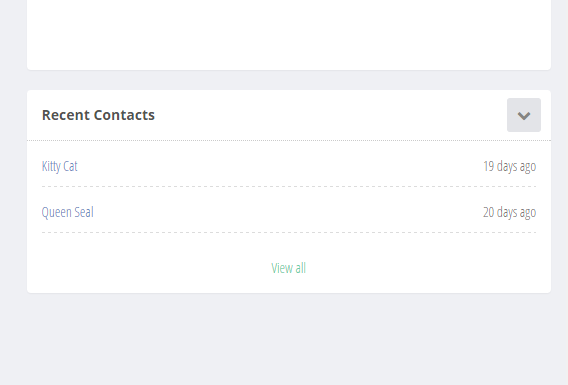
Recent Contacts

A list of recent contacts that have been captured in your system.

Account Users

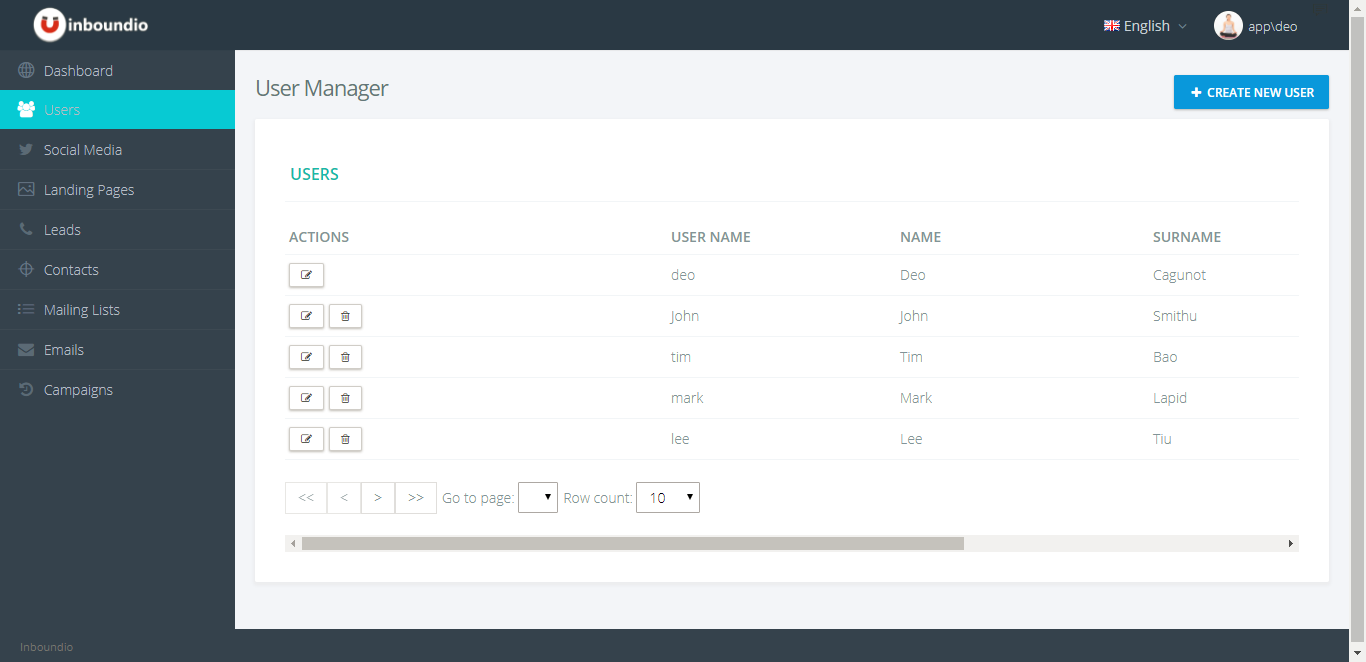
User Manager

Available to "STANDARD" plan users only, the user manager allows you to manage users with access to the platform. All users are equal and the manager will allow you to add, edit and remove users up to the limit defined by your administrator.

Create Users

Should you need to create a user to help manage your inbound marketing, you can create a user through the Create User facility.

To create a user:

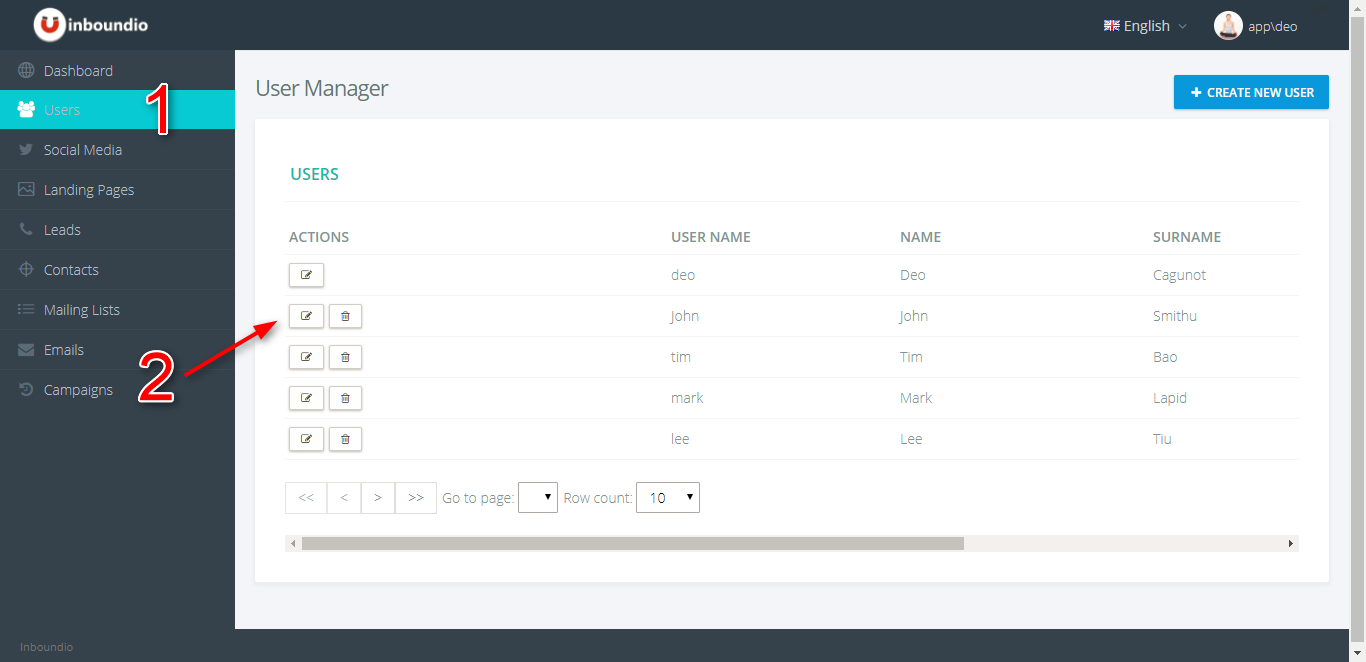
  1. Navigate to the "Users" area from the left hand menu.
  2. If you have not reached your user limit you will have a "New User" button available at the top of the screen.
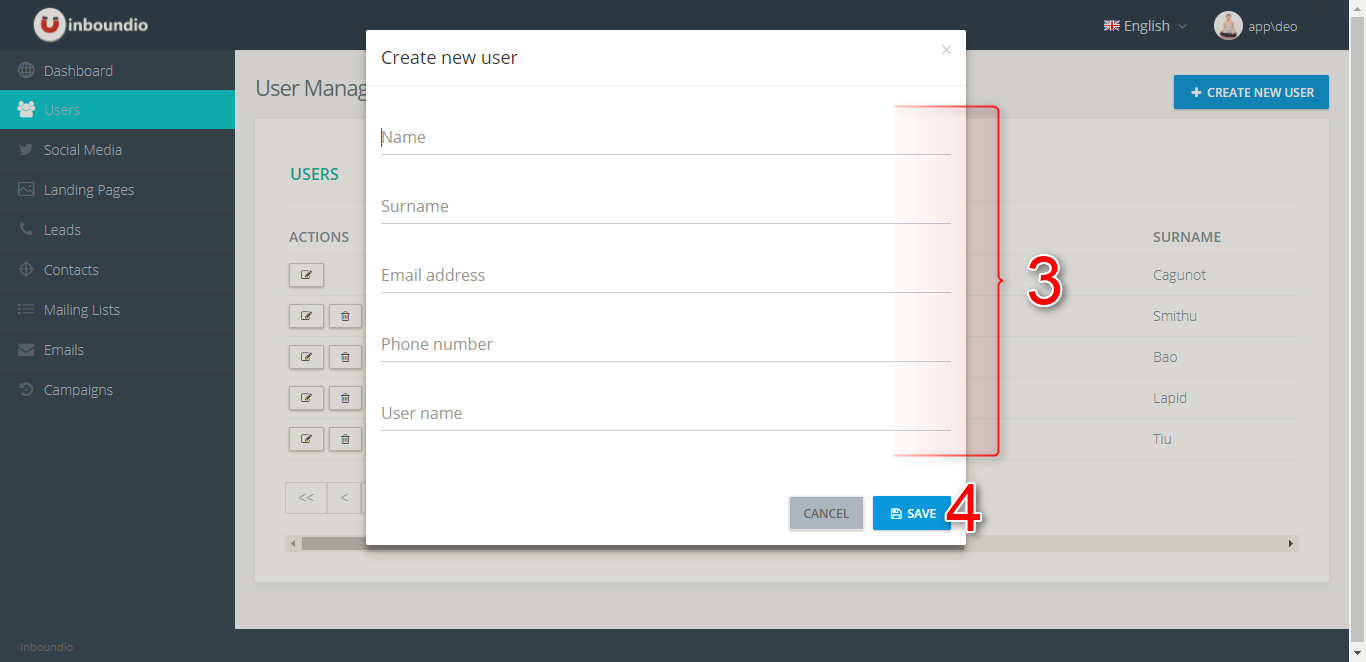
  3. Enter in all the fields provided
  4. Click the "Create User" button

Edit Users

At any point while logged into your dashboard you have the ability to edit a user's information including their contact information and password.

To edit a user:

  1. Navigate to the "Users" area from the left hand menu.
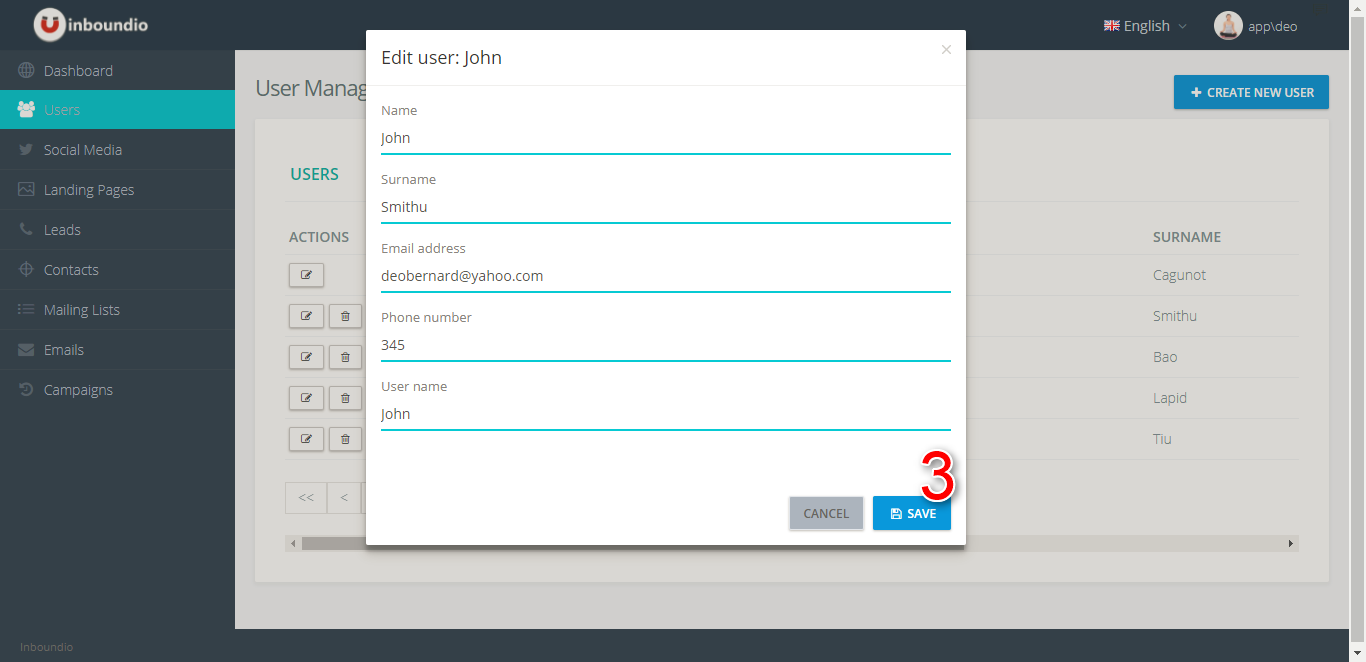
  2. A grid is displayed of all the existing users, select edit next to the desired user in the grid.
  3. A popup will be displayed simply update any of the required information and click the "Update User"

Remove Users

To remove a user:

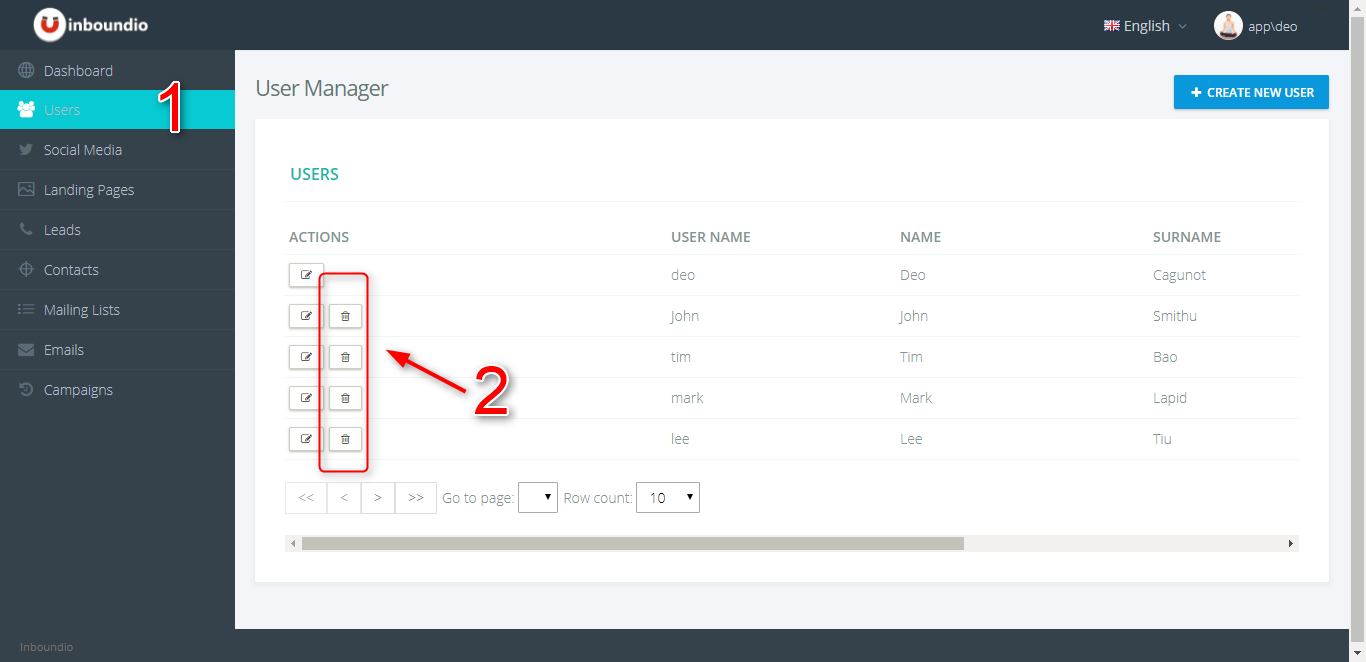
  1. Navigate to the "Users" area from the left hand menu.
  2. A grid is displayed of all the existing users, select edit next to the desired user in the grid.
  3. Click the "remove" icon in the grid row next to the user you wish to remove
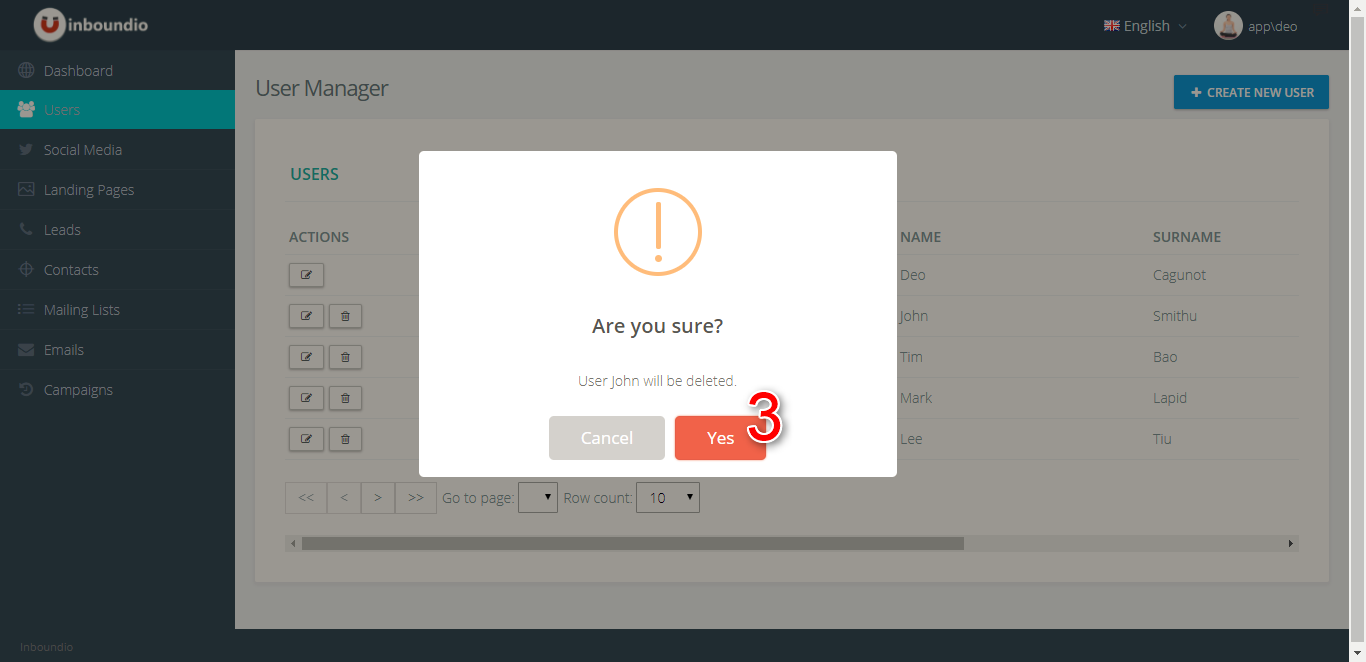
  4. Confirm the removal on the confirmation dialog.

Social Media

Connecting Facebook

Before you can start posting to social media you need to connect your social media accounts to the platform. This only has to be completed once, but can be a little tricky for some users. We have created a video guide how to connect to Facebook.

To connect to Facebook:

  1. Navigate to the "Social Media" area from the left hand menu.
  2. Click the "Connect with Facebook" button at the top of the screen
  3. If you are not logged in to Facebook you will be asked to do so. Login by entering your Facebook email address and password.
  4. After login you will be presented with a prompt, click "OK" to accept the connection
  5. You will be returned to the platform and you have successfully connected to your Facebook

Disconnecting Facebook

To disconnect from Facebook:

  1. Navigate to the "Social Media" area from the left hand menu.
  2. Click the "Disconnect from Facebook" button at the top of the screen

Connecting Twitter

Before you can start posting to social media you need to connect your social media accounts to the platform. This only has to be completed once, but can be a little tricky for some users.

To connect to Twitter:

  1. Navigate to the "Social Media" area from the left hand menu.
  2. Click the "Connect with Twitter" button at the top of the screen
  3. You will be presented with a Twitter authorization screen
  4. Enter your Twitter Username or Email and Password, then click the "Authorize App" button
  5. A redirection page will be displayed the should return you back to your dashboard
  6. Your Twitter account is now successfully connected

Disconnecting Twitter

To disconnect from Twitter:

  1. Navigate to the "Social Media" area from the left hand menu.
  2. Click the "Disconnect from Twitter" button at the top of the screen

Connecting LinkedIn

Before you can start posting to social media you need to connect your social media accounts to the platform. This only has to be completed once, but can be a little tricky for some users.

To connect to LinkedIn:

  1. Navigate to the "Social Media" area from the left hand menu.
  2. Click the "Connect with LinkedIn" button at the top of the screen
  3. You will be presented with a LinkedIn authorization screen
  4. Enter your LinkedIn Email and Password, then click the "Allow Access" button
  5. If successful you will be redirected back to your dashboard
  6. Your LinkedIn account is now successfully connected

Disconnecting LinkedIn

To disconnect from LinkedIn:

  1. Navigate to the "Social Media" area from the left hand menu.
  2. Click the "Disconnect from LinkedIn" button at the top of the screen

Post a Message

To post a message:

  1. Navigate to the "Social Media" area from the left hand menu.
  2. Enter the text you wish to post into the "Message" text box
  3. Enter when you would like to schedule the post in the "Schedule At" field, this is optional
  4. Specify a picture to associate with our post
  5. Select the checkboxes for the social media platforms you wish to publish
  6. For LinkedIn and Facebook you can also select the page you wish to publish your post to
  7. Click the "Post Message" button

View Message History

A summary of your previously posted messages is available on the right hand side of your social media area.

Note: removing a post only removes it from the platform it does not remove the post from your social media.

Landing Pages

Manage Landing Pages

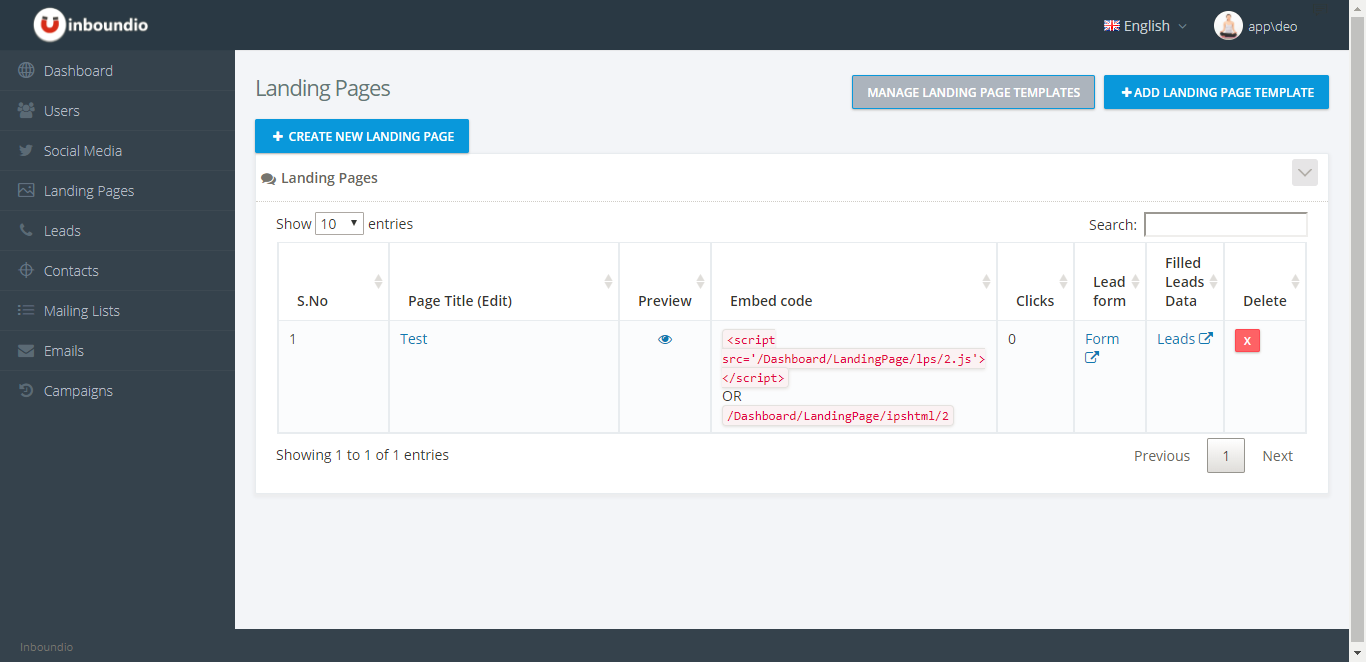
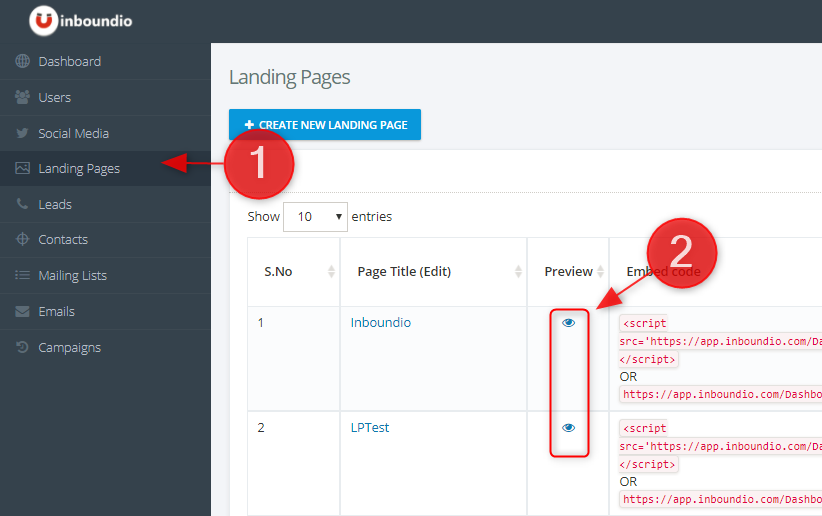
To access your landing pages navigate to the "Landing Pages" area from the left hand menu. You will be presented with a list of your current landing pages that includes the snippets used to include your landing page on your website as well as preview, edit and delete capabilities.

Create Landing Pages

Landing Pages are based on Landing Page Templates within the platform to ensure you have consistency in design without having to recreate a landing page from scratch every time. Ensure that you have created a Landing Page Template before creating your landing page.

To create a landing page:

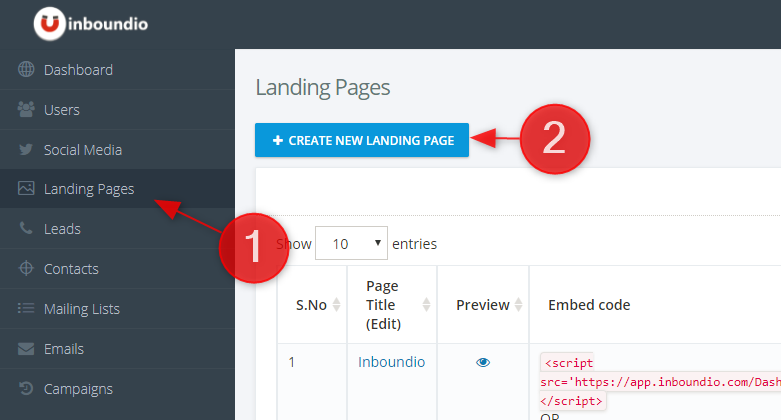
  1. Navigate to the "Landing Pages" area from the left hand menu.
  2. Click the "Create New Landing Page" button
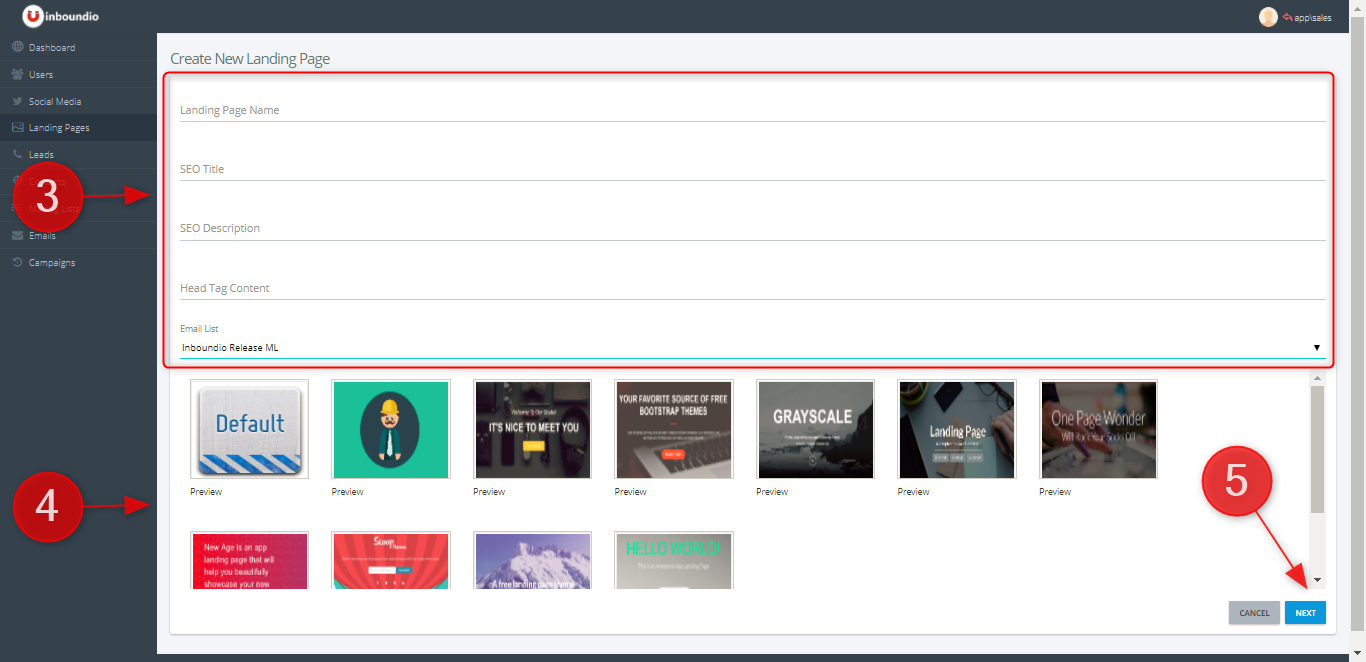
  3. Enter a name for your landing page template so you can identify it later and populate the required fields
  4. Select a landing page template to serve as the base for your landing page or you can proceed to next step to create your own from the scratch
  5. Click Next
  6. You can change the text and image or anything which you want. Click on the toggle icon. It will show different type of blocks that you can drag onto the canvas. It helps to know HTML to customize your landing page templates and if you do not feel comfortable we recommend contacting your administrator or web developer to obtain a price for creating one for you.
  7. Once you're done click Save Landing Page


Edit Landing Pages

To edit a landing page:

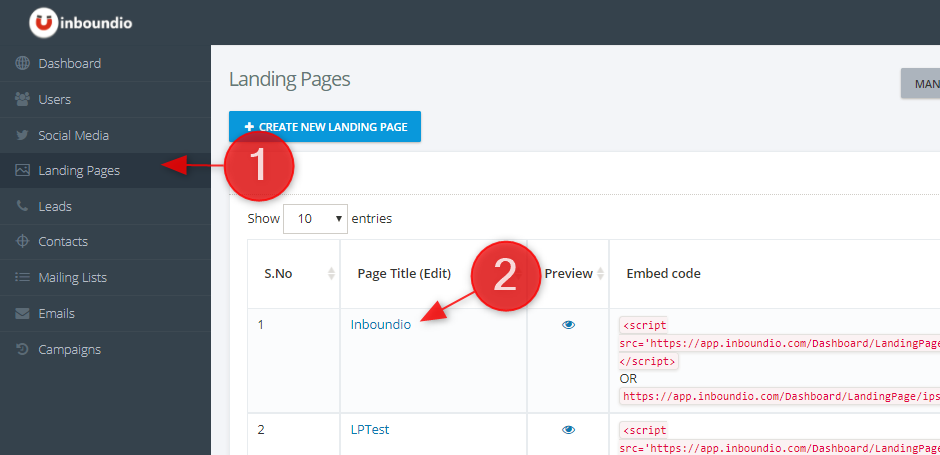
  1. Navigate to the "Landing Pages" area from the left hand menu.
  2. Click on the title of the landing page to enter edit mode
  3. As with creating a landing page you can follow the steps from 3 onwards.

Remove Landing Pages

If you have finished with a landing page ensure you have removed all links on your website prior to removing the landing page from your system.

To remove a landing page:

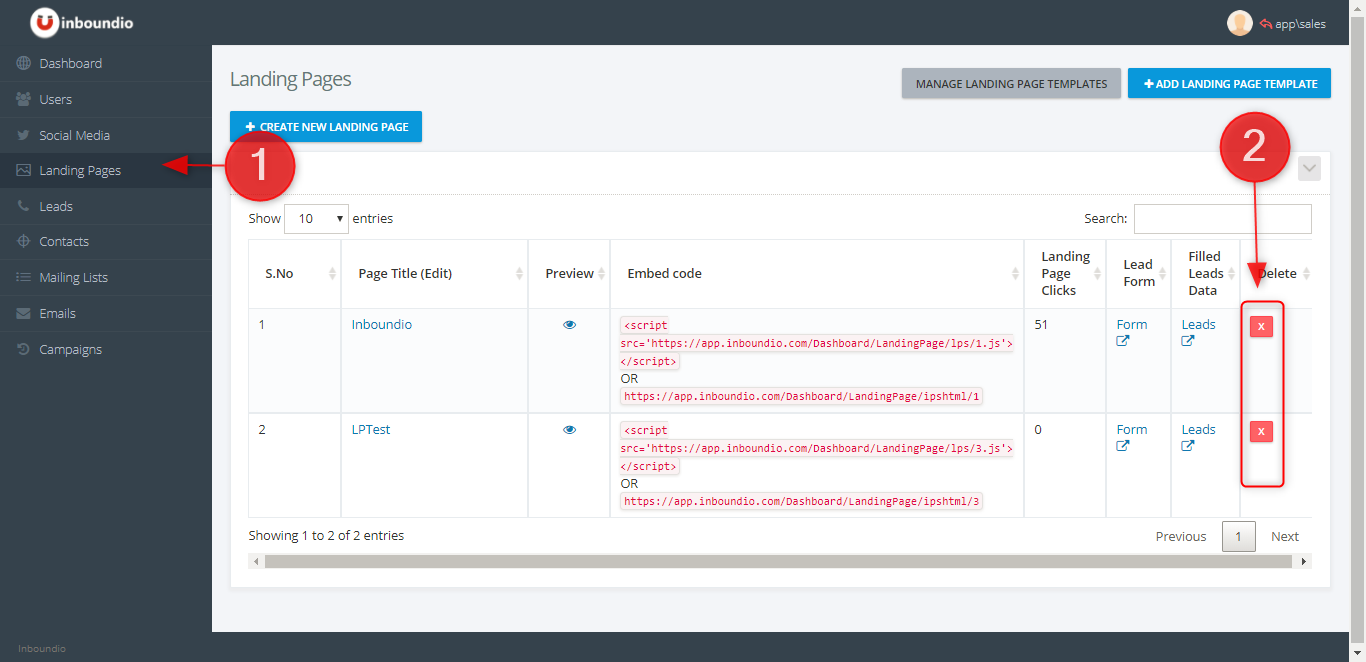
  1. Navigate to the "Landing Pages" area from the left hand menu.
  2. Click on the Remove icons in the delete column of the landing page manager grid
  3. Confirm you wish to delete the item to remove the landing page

Preview Landing Pages

While there are multiple ways to preview your landing page, the easiest way is to:

  1. Navigate to the "Landing Pages" area from the left hand menu.
  2. Click on the preview icons in the preview column of the landing page manager grid
  3. Your landing page will view in a separate browser

Lead Form Editor

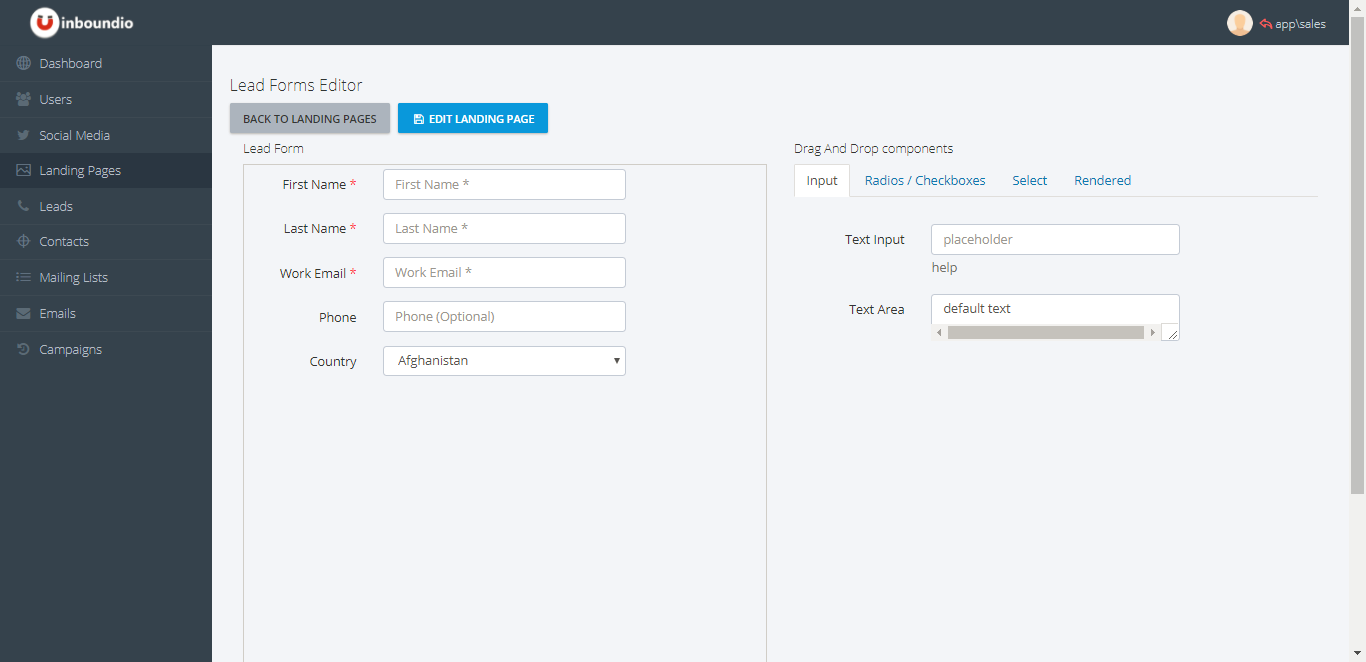
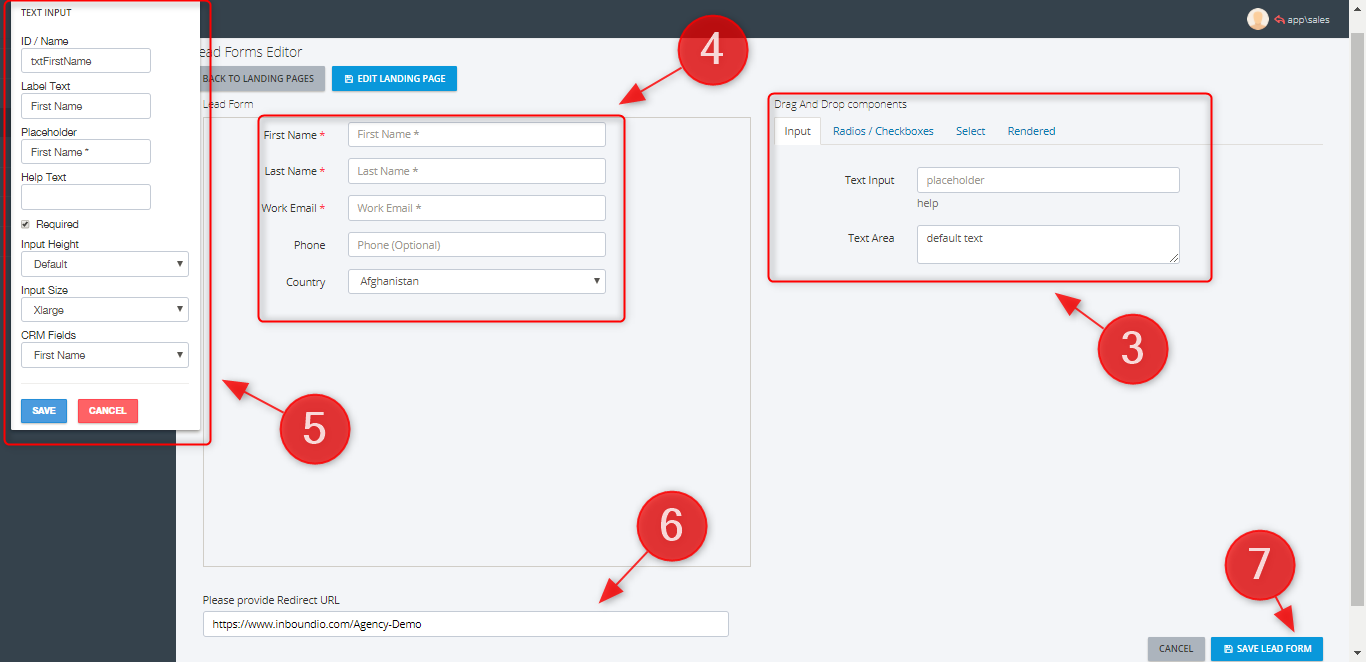
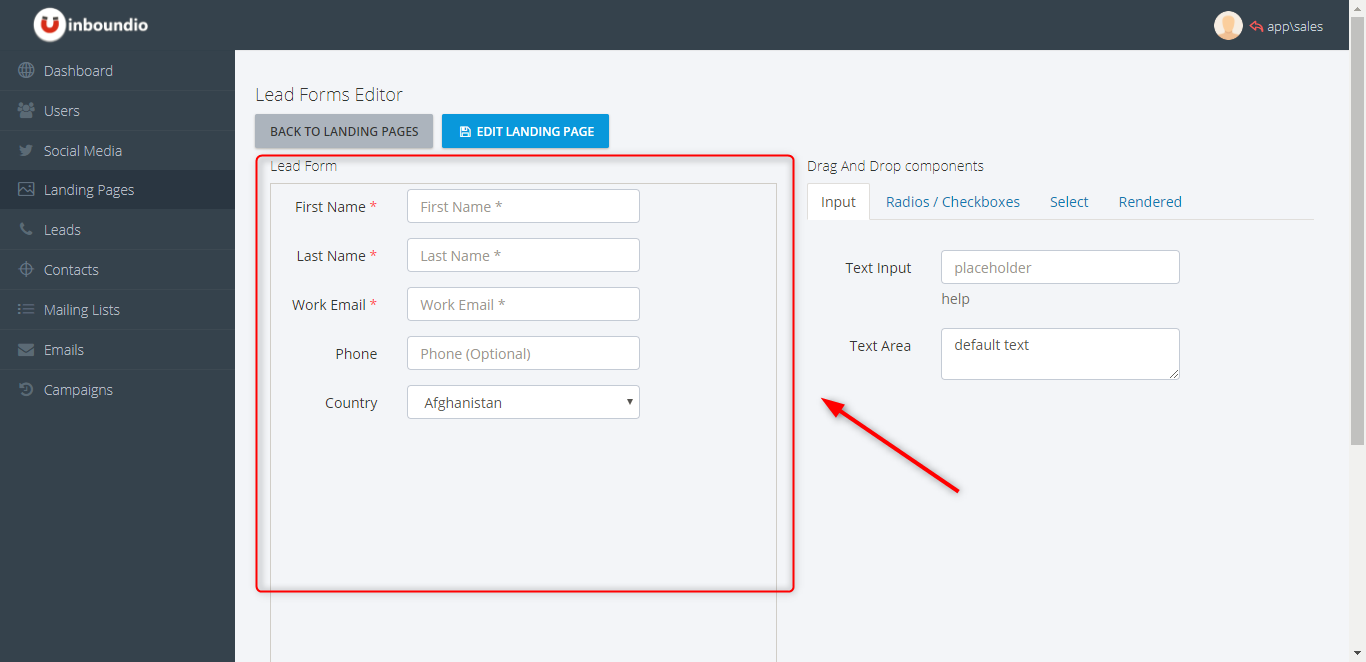
The lead form editor is used for creating forms to capture information on your landing pages. The system has some in built / default fields available that allow you to automatically capture lead information into your CRM.

There are 2 ways to enter into the Lead Form Editor, directly via the "Lead Form" link in the grid on the Landing Page Manager or after saving while editing / creating a landing page

Add Form Fields

To add form fields

  1. Navigate to the "Landing Pages" area from the left hand menu
  2. Click Lead From you wish to add a form fields
  3. Drag a components that you want to include into your form to the right canvas
  4. Click on a field that you wish to modify
  5. A popup box will appear for the properties of selected field. Edit the information accordingly then click Save button
  6. Provide a redirect URL
  7. Click the "Save Lead Form" button

Edit Form Fields

To edit a form field

  1. Navigate to the "Landing Pages" area from the left hand menu
  2. Click Lead From you wish to edit
  3. You can follow the steps 3 or 4 of Add Forms Fields

Remove Form Fields

To remove a form field

  1. Navigate to the "Lead Form you wish to edit"
  2. Click and drag the field you want to remove outside of the canvas
  3. Click the "Save Leav Form" Button

Order Form Fields

Updating form field order is easy, to reorder the form fields

  1. Navigate to the "Lead Form Editor"
  2. Scroll to the "Editable Table" area
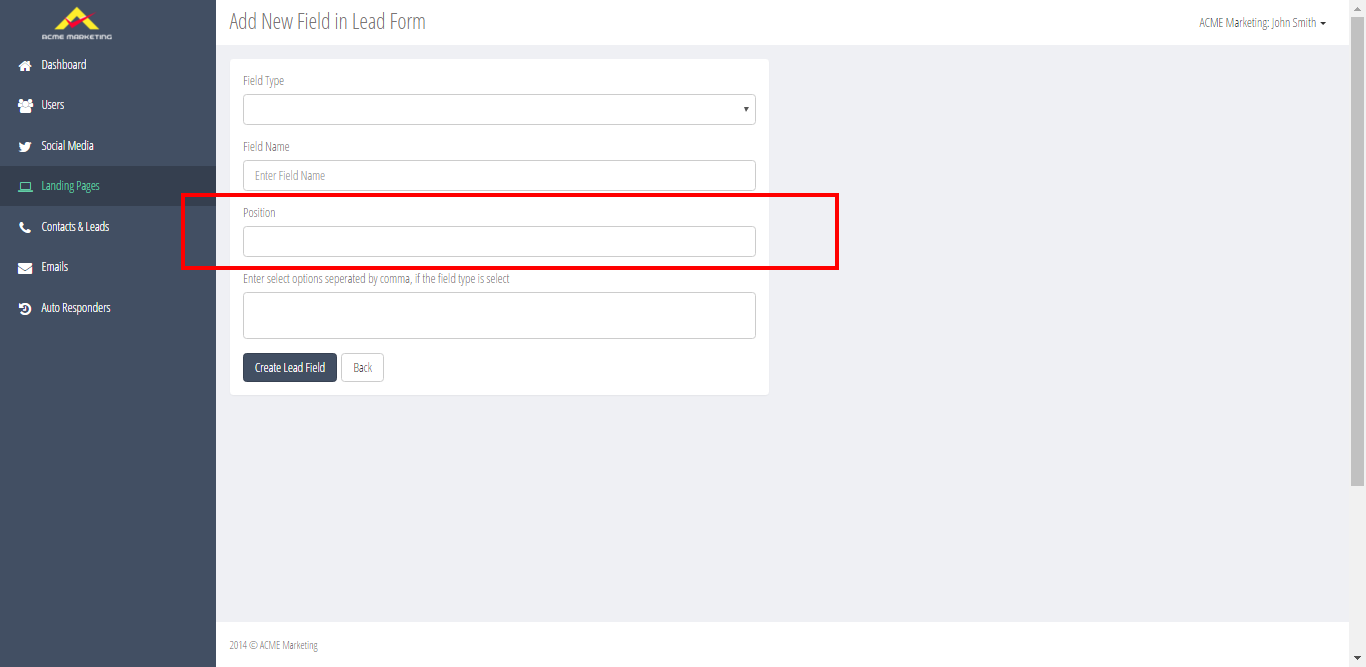
  3. Click the "Edit" link next to the existing form field you wish to reorder
  4. Change the position field number higher or lower based on your desired field order
  5. Click the "Update Lead Field" button

When creating form fields we recommend entering positions in increments of 10 e.g. Field 1 = 10, Field 2 = 20 etc. This makes it easier to reorder fields in the future

Using Landing Pages With Your Website

One of the post important steps is ensuring visitors can get to your landing page.

Once a landing page has been created and ready to launch there are 2 easy methods to include the landing page on your website

Option 1 - Insert the Script for the landing page into the desired location on your website

To use an the script embed option

  1. Open your marketing dashboard in a new browser tab and navigate to "Landing Pages" from the left menu
  2. Each landing page has 2 example embed codes displayed
  3. Highlight and copy the first before the "OR" e.g. <script src="http://yourdashboarddomain/lps/10.js"></script>
  4. Open your website and create or edit the page you wish to embed your landing page
  5. Make sure the page is in source/html editing view and paste the embed code onto your page
  6. Save, Preview and adjust the position as required

Option 2 - Link to the landing page so that it opens in a new browser tab/window

To use an the script embed option

  1. Open your marketing dashboard in a new browser tab and navigate to "Landing Pages" from the left menu
  2. Each landing page has 2 example embed codes displayed
  3. Highlight and copy the second after the "OR" that will just be a url e.g. http://yourdashboarddomain/lps/10
  4. Open your website and create or edit the page you wish to embed your landing page
  5. Create a link and enable it to open in a new window
  6. Paste the url as the address for the link that you copied from point 3
  7. Save, Preview and adjust the position as required

Option 1

Option 2

Landing Page Templates

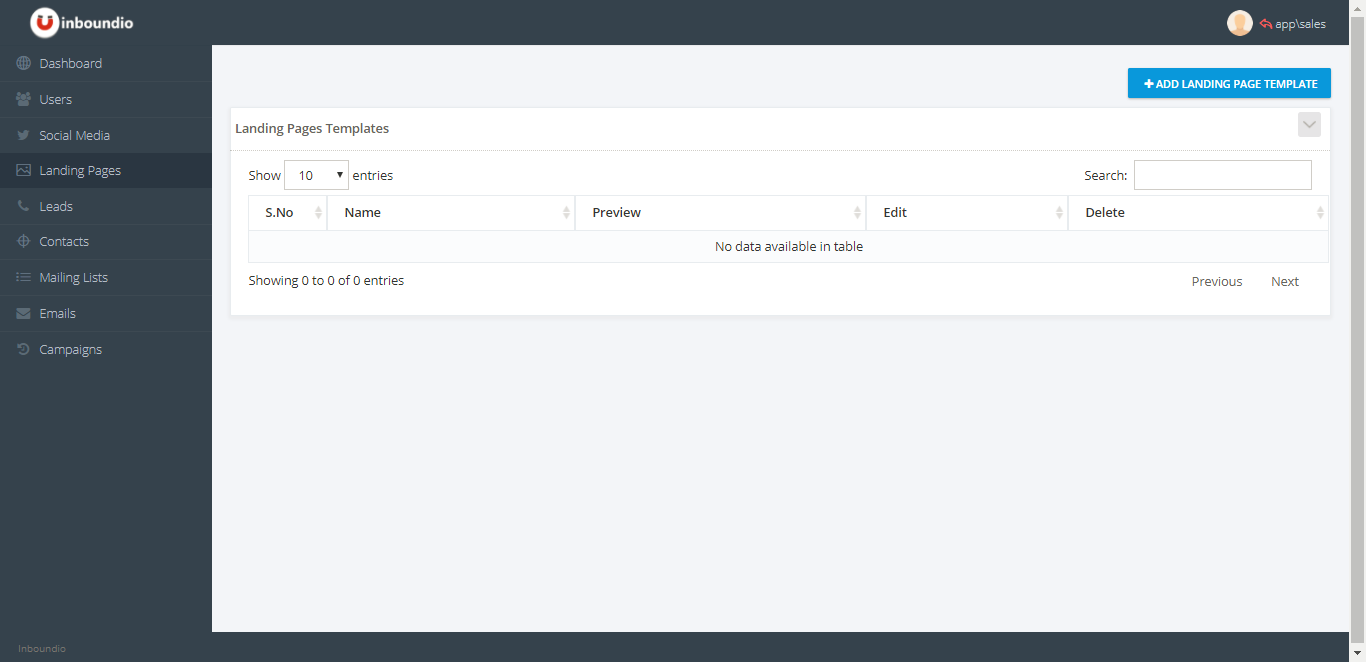
"Landing Pages" are built off "Landing Page Templates" to allow you to build the basic design once and then deliver consistent landing pages.
The system comes with a number of landing page templates for immediate use or to start your customisations.

It is recommended that initial templates be created by a professional designer/developer.

Creating Landing Page Templates

To create a landing page template:

  1. Navigate to the "Landing Page" area from the left hand menu.
  2. Click the "Add Landing Page Template" button in the top right
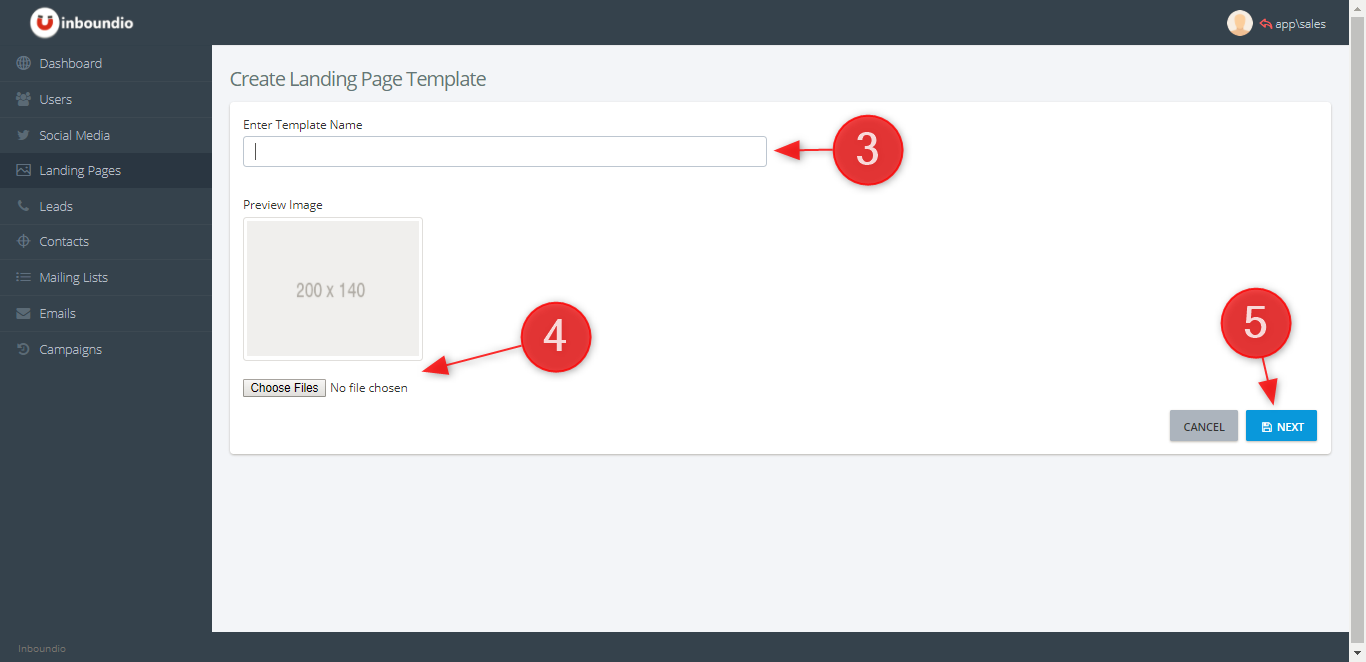
  3. Enter a name for your template
  4. Upload an image for your landing page. This could be a screen shot of your first finished landing page and can be added later.
  5. Click Next
  6. Click on the toggle icon. It will show different type of blocks that you can drag onto the canvas. It helps to know HTML to customize your landing page templates and if you do not feel comfortable we recommend contacting your administrator or web developer to obtain a price for creating one for you.
  7. Once you're done click Save Landing Page


Contacts & Leads

Contacts Manager

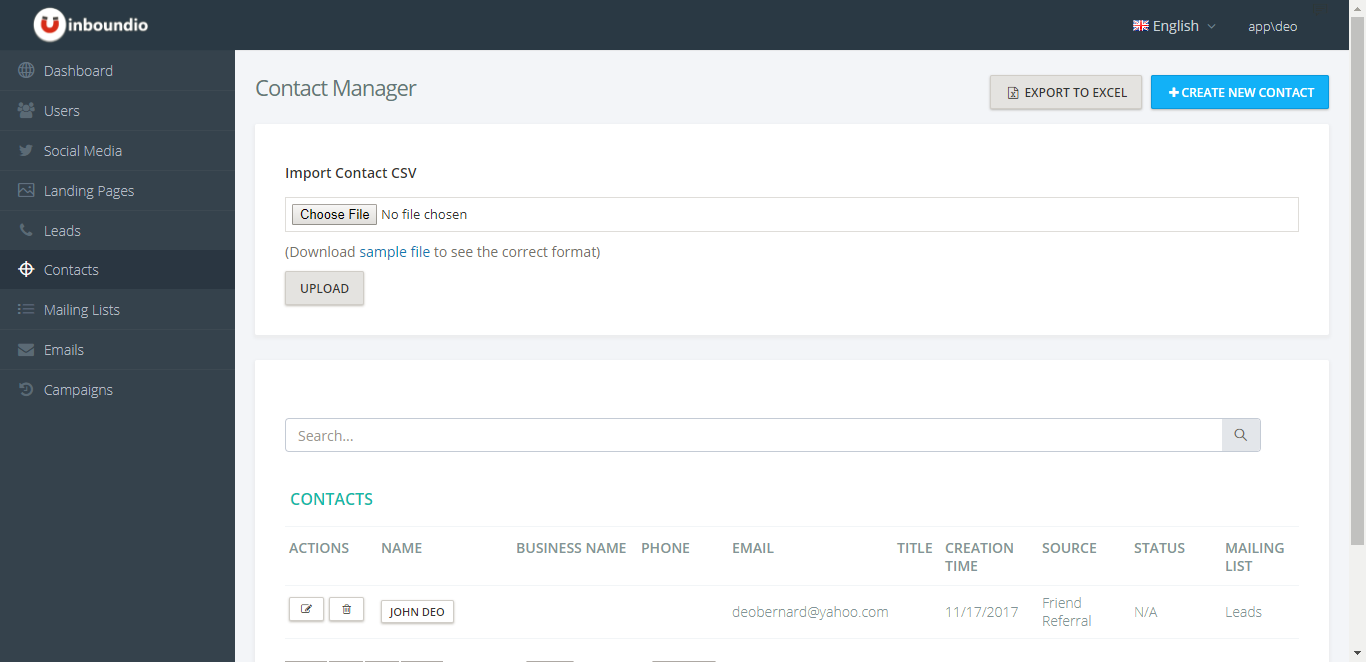
The contacts manager allows you to capture and maintain leads and contact information captured through your landing pages or manually entered.

The contacts manager contains:

  • A grid of contacts with a search facility for easily finding contacts
  • Export contacts facility
  • Import contacts facility
  • Adding and managing lead types used to categorise leads for marketing

Creating Contacts

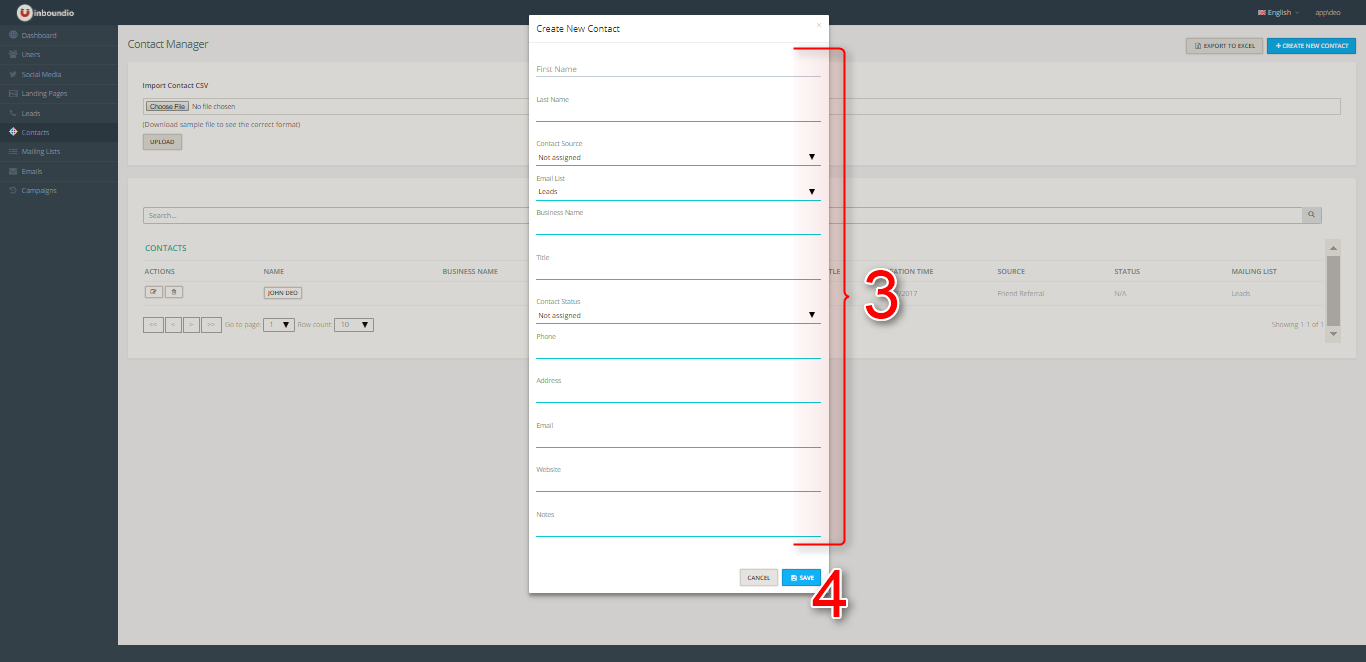
To create a contact manually:

  1. Navigate to the "Contacts" area from the left hand menu.
  2. Click on the "Add New Contact" button in the top left of the screen
  3. Fill out the details ensuring you fill out important information like email, first and last name
  4. Click the "Save" button

Editing Contacts

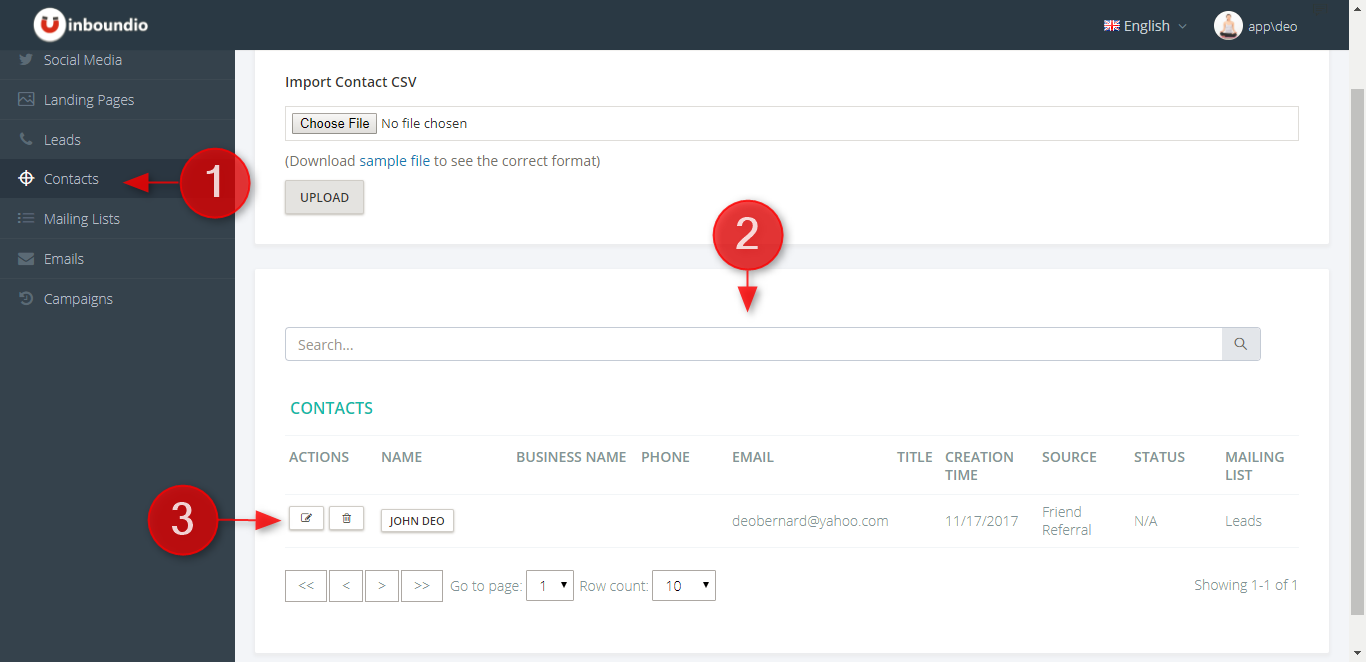
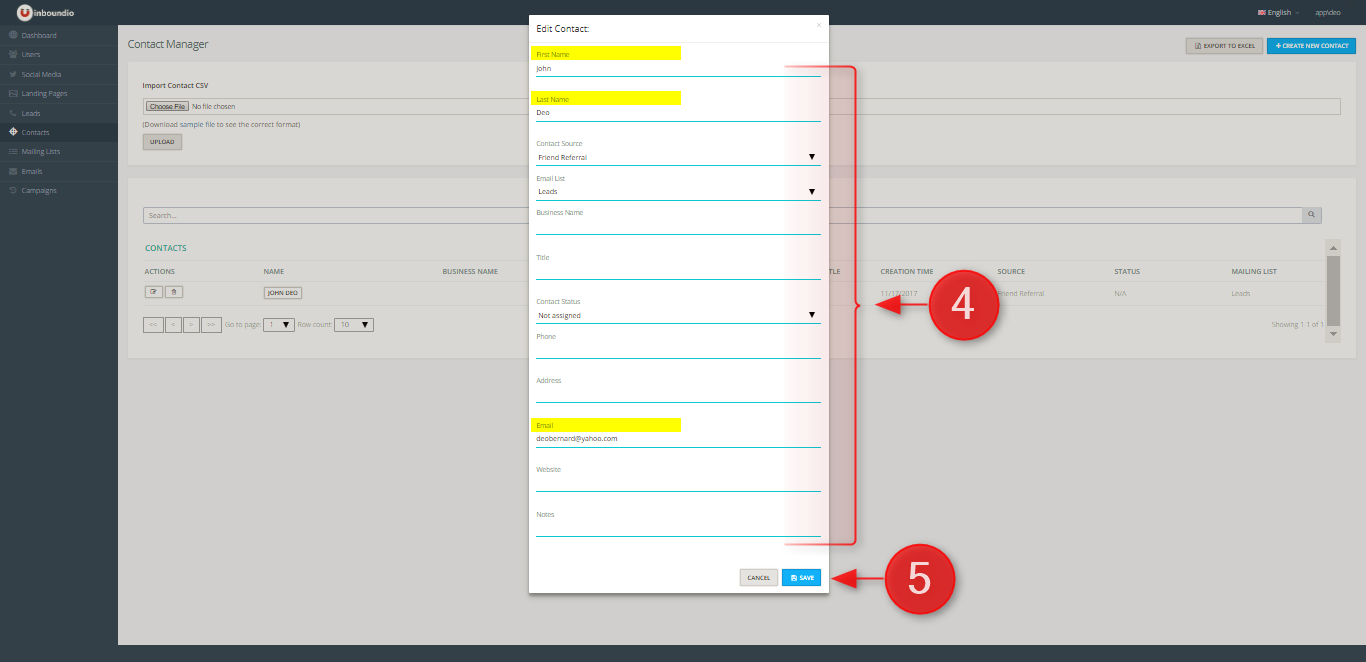
To edit a contact:

  1. Navigate to the "Contacts" area from the left hand menu.
  2. Search and locate the contact you wish to edit
  3. Click on the "Edit" link in the grid on the row of the contact you wish to edit
  4. Fill out the details ensuring you fill out important information like email, first and last name
  5. Click the "Update" button

Removing Contacts

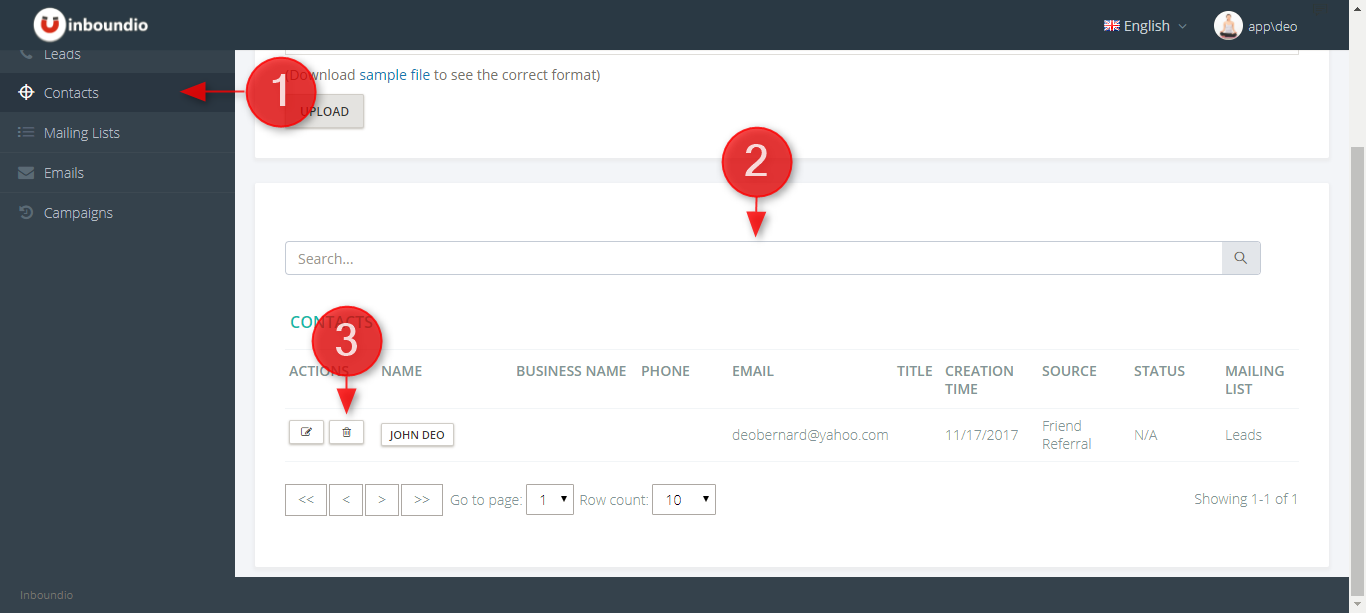
To remove a contact:

  1. Navigate to the "Contacts & Leads" area from the left hand menu.
  2. Search and locate the contact you wish to remove
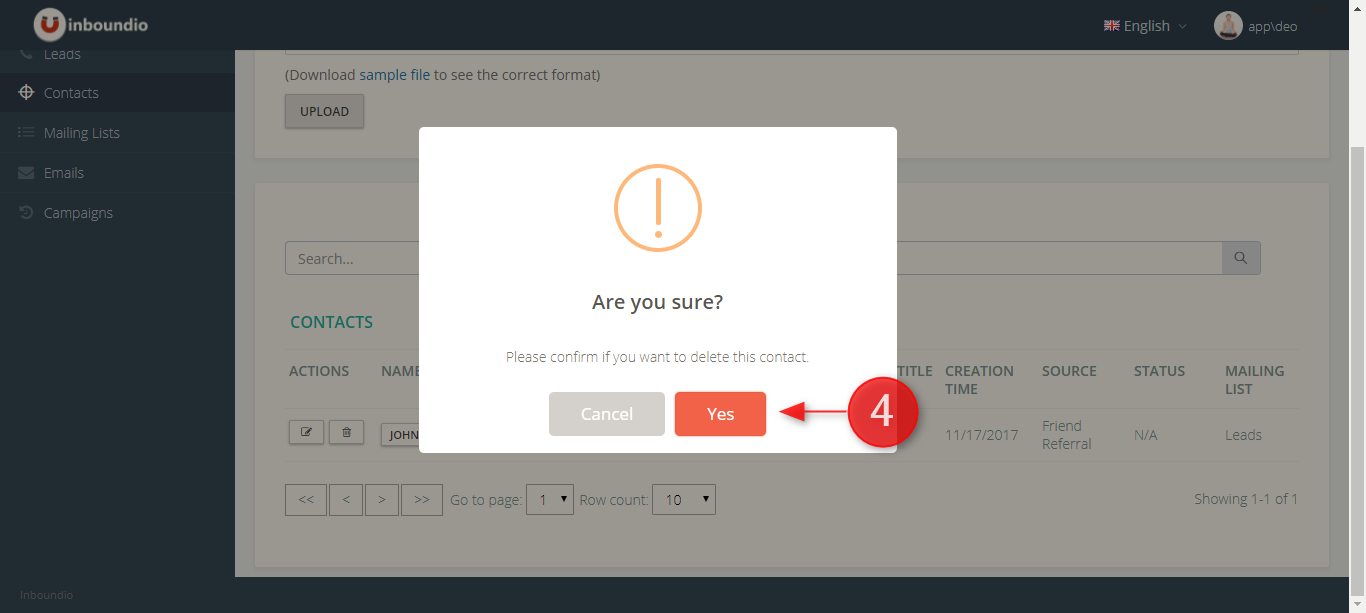
  3. Click on the "Delete" icon in the grid on the row of the contact you wish to remove
  4. Confirm the removal

Import Contacts

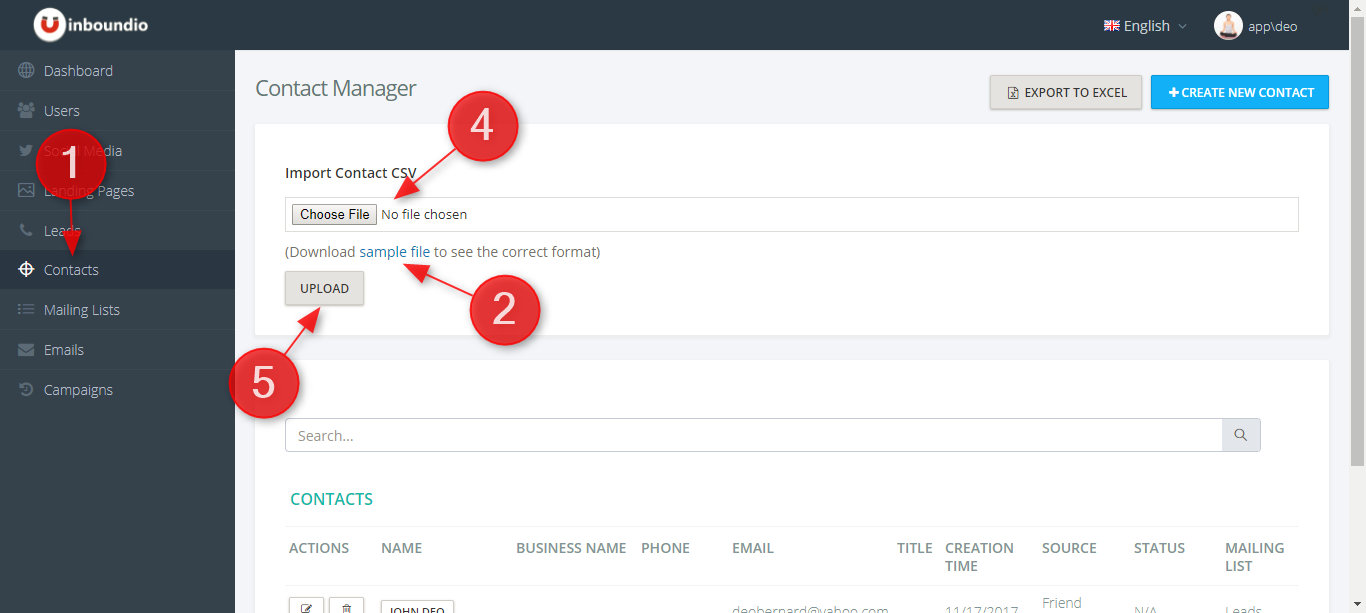
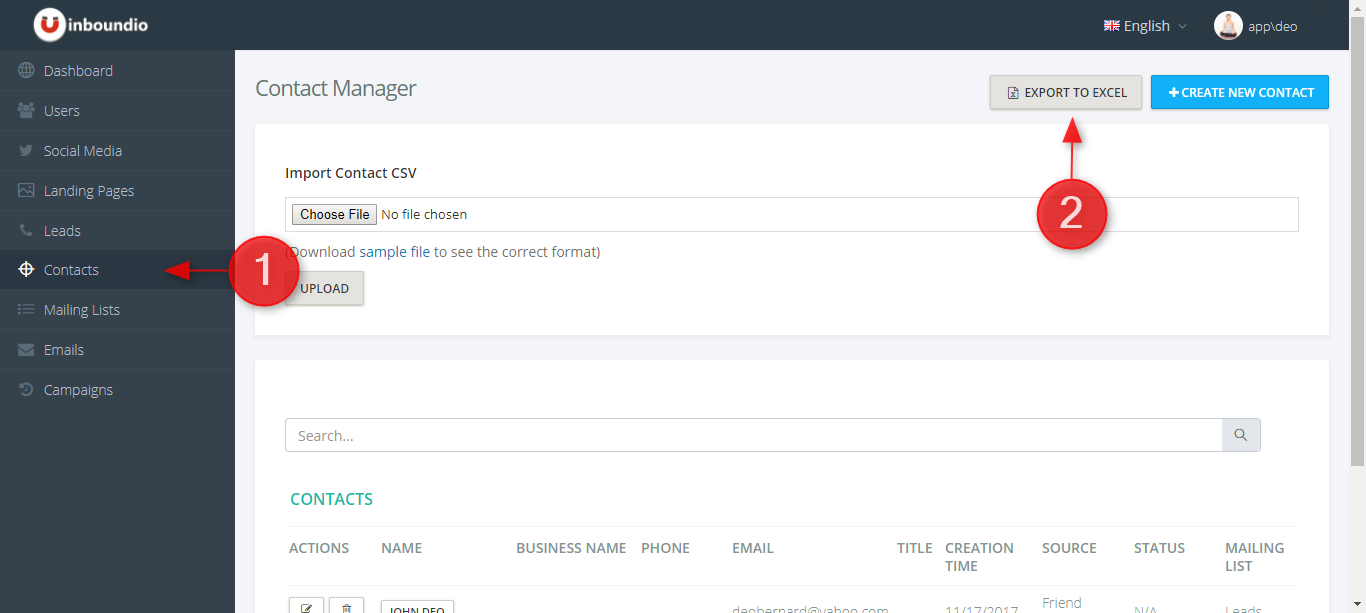
To import contacts:

  1. Navigate to the "Contacts & Leads" area from the left hand menu.
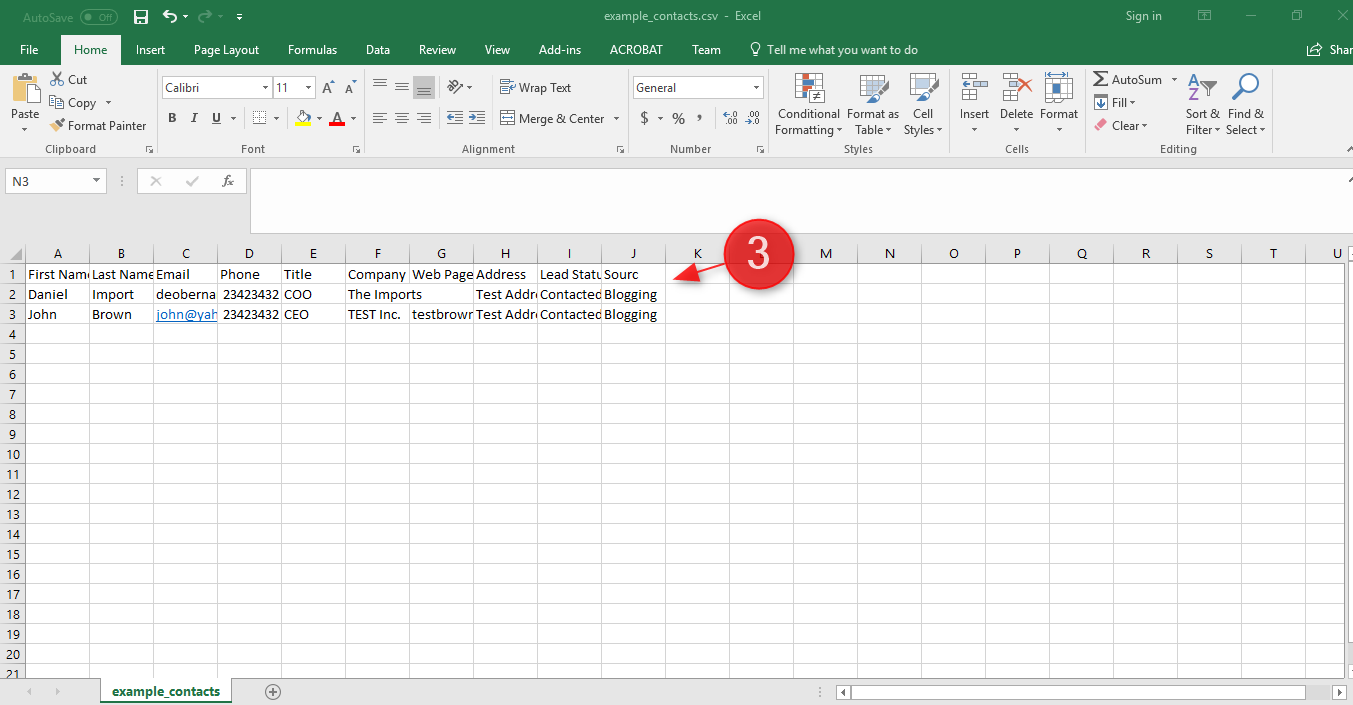
  2. Download the sample file provided in the "Import Contact CSV" area
  3. File the sample file with as much information as possible for each contact
  4. When ready, Select the file in the "Import Contact CSV" area
  5. Click the "Import Contact" button

Export Contacts

To export contacts:

  1. Navigate to the "Contacts" area from the left hand menu.
  2. From the "Export CSV" area, click the "Export" button

Mailing List

Mailing Lists are used to categorise contacts in groups, e.g. Cold Leads, Hot Leads etc. These leads types are then used to send marketing campaigns via email as well as assist you to improve your management of your inbound marketing.

At the bottom right of the "Contacts & Leads" area there is the ability to add and manage status types.

Creating Mailing Lists

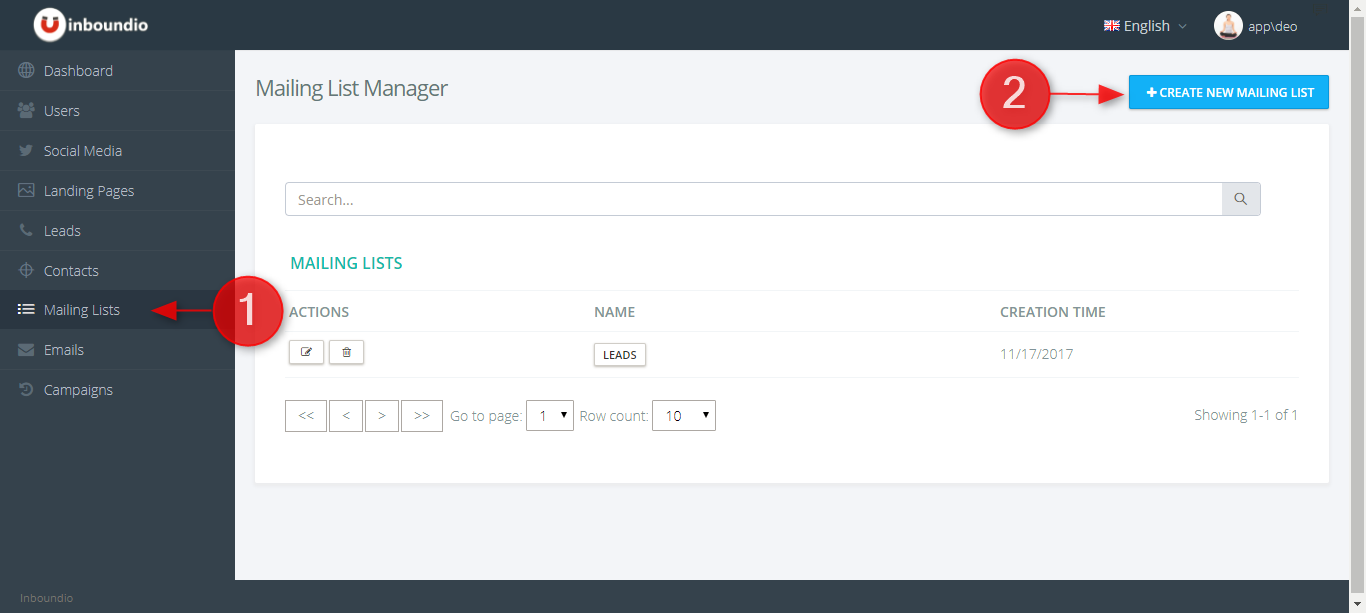
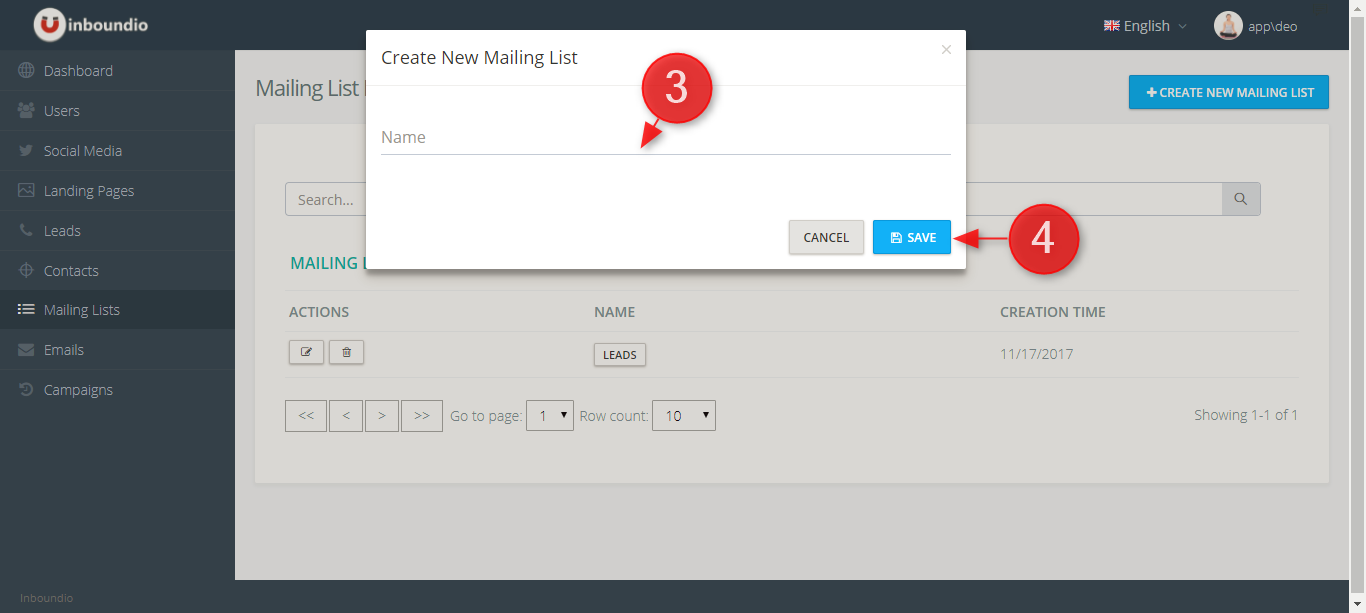
To create mailing list:

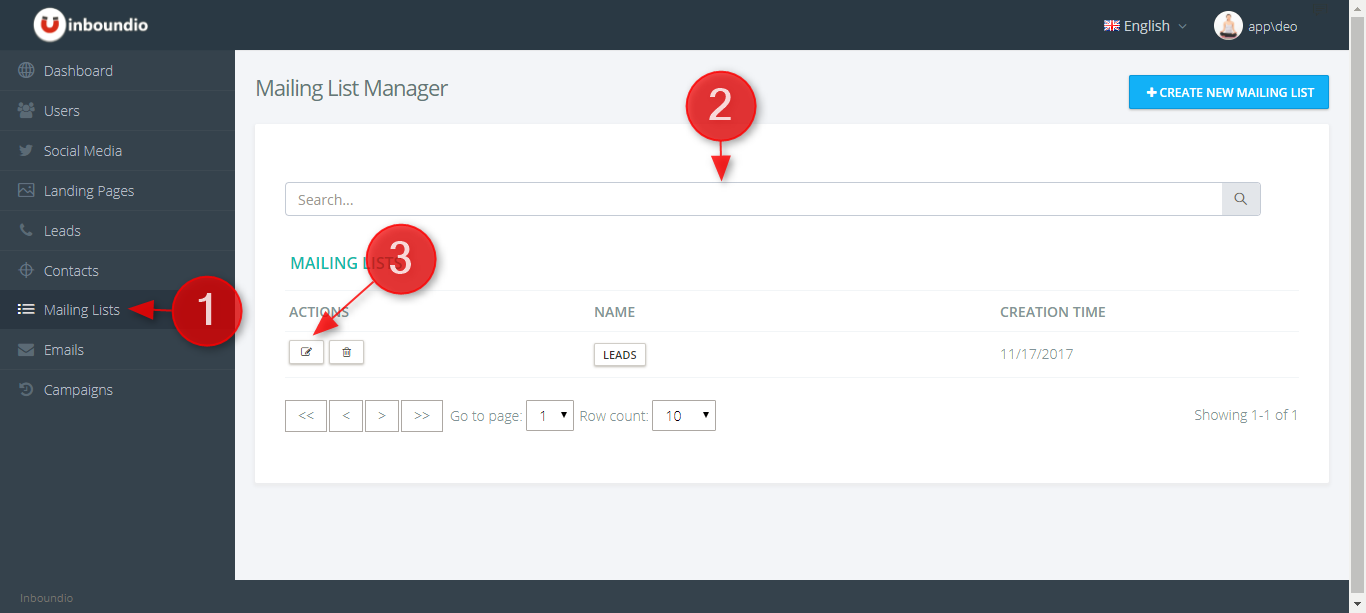
  1. Navigate to the "Mailing Lists" area from the left hand menu.
  2. Locate the " Create new mailing list" area
  3. Enter text into the text input field
  4. Click the "Save" button

Editing Mailing Lists

To edit a mailing lists:

  1. Navigate to the "Mailing Lists" area from the left hand menu.
  2. Search and locate the mailing lists you wish to edit
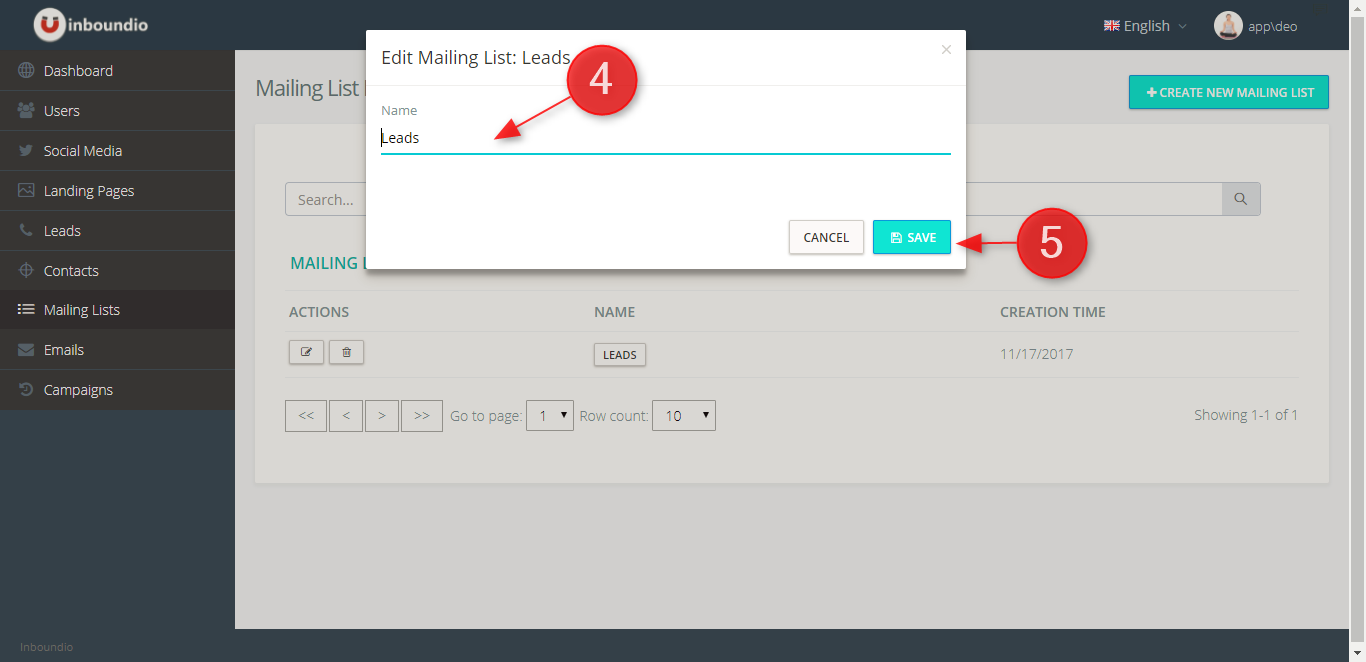
  3. Click on the "Edit" icon in the grid on the row of the mailing lists you wish to edit
  4. Modify the detail
  5. Click the "Save" button

Removing Mailing Lists

Be careful in removing the mailing lists, ensure this is not connected to any active contacts and leads, otherwise contacts and leads will not have a mailing list assigned and cannot be emailed.

To remove status types:

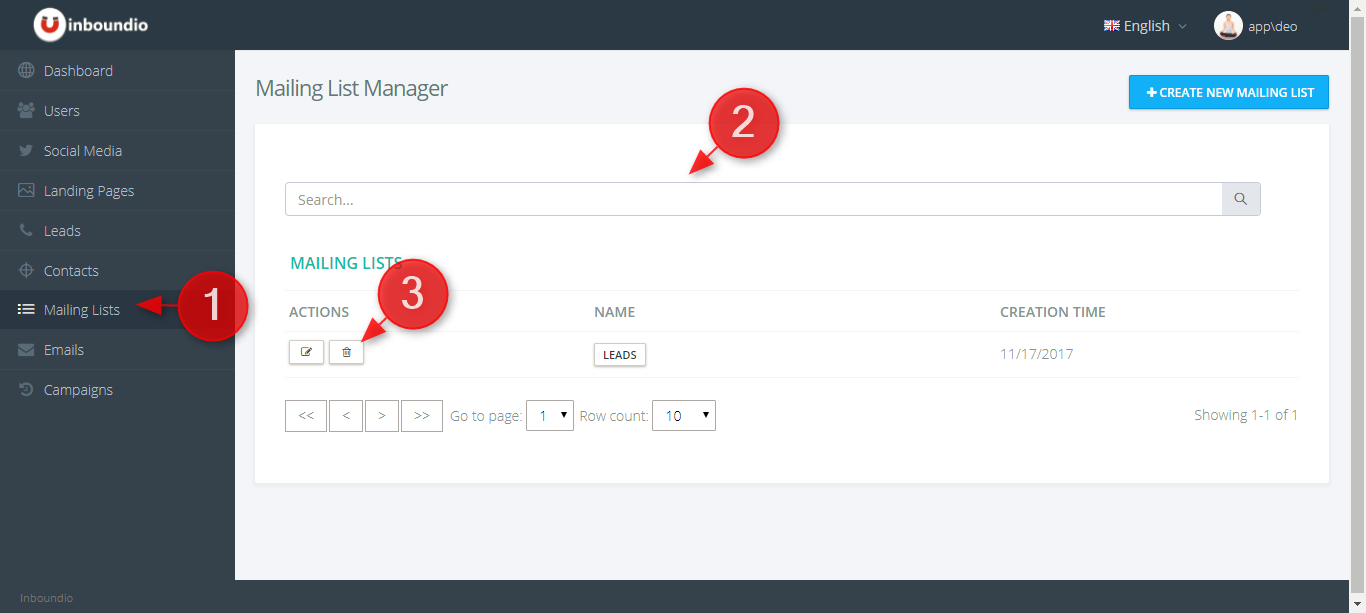
  1. Navigate to the "Mailing Lists" area from the left hand menu.
  2. Search and locate the mailing list you wish to remove
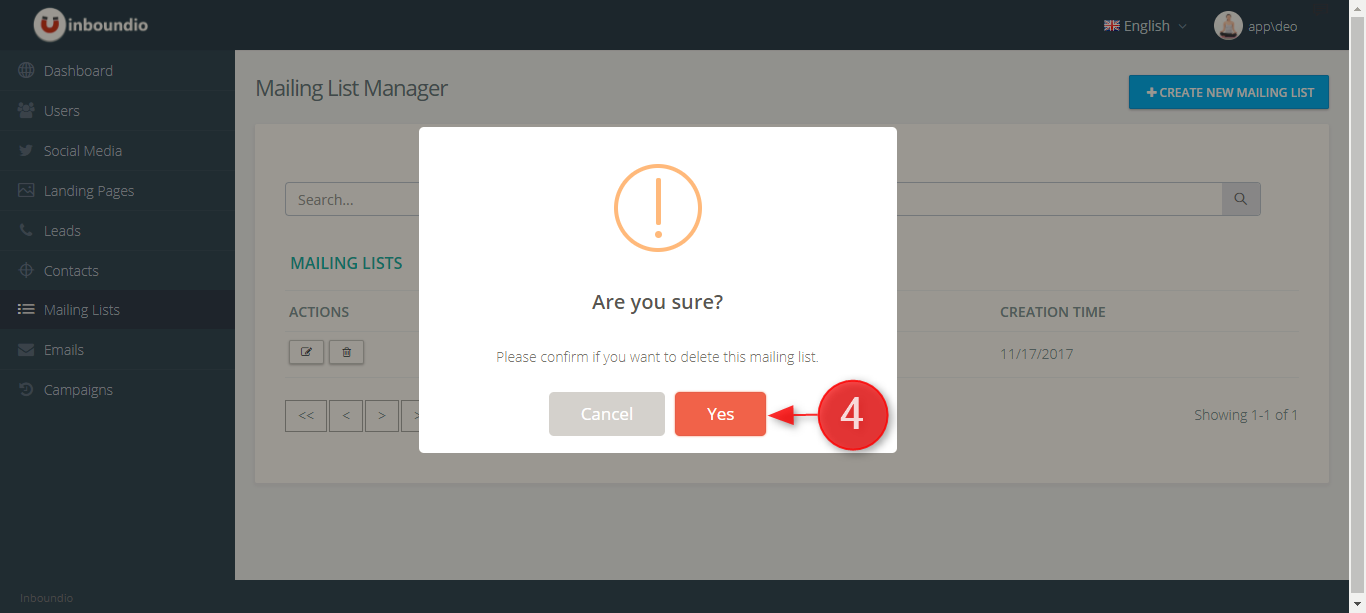
  3. Click on the "Delete" icon in the grid on the row of the contact you wish to remove
  4. Confirm the removal

Emails

Avoiding Spam

TO DO

Many email services now implement Send Policy Framework(SPF) that is designed to avoid spam by storing a list of allowed email servers capable of sending email for a domain. More information on SPF can be found on Wikipedia and OpenSPF.

To give your emails the best chance of getting through you need to add an SPF record to your DNS. This may require assistance your IT or website provider

To set these up you will need to have your DNS administrator add 2 entries into your DNS using the IP address provided during onboarding.

Type
Name
TTL
Text
TXT
<Your Domain Name> e.g. yourdomain.com.au OR @ on some DNS providers
3600
<Insert IP Address>
A
manager
3600
<Insert IP Address>

Once complete allow to propogate and then navigate to the URL's to test.

View Past Emails

To view past sent emails:

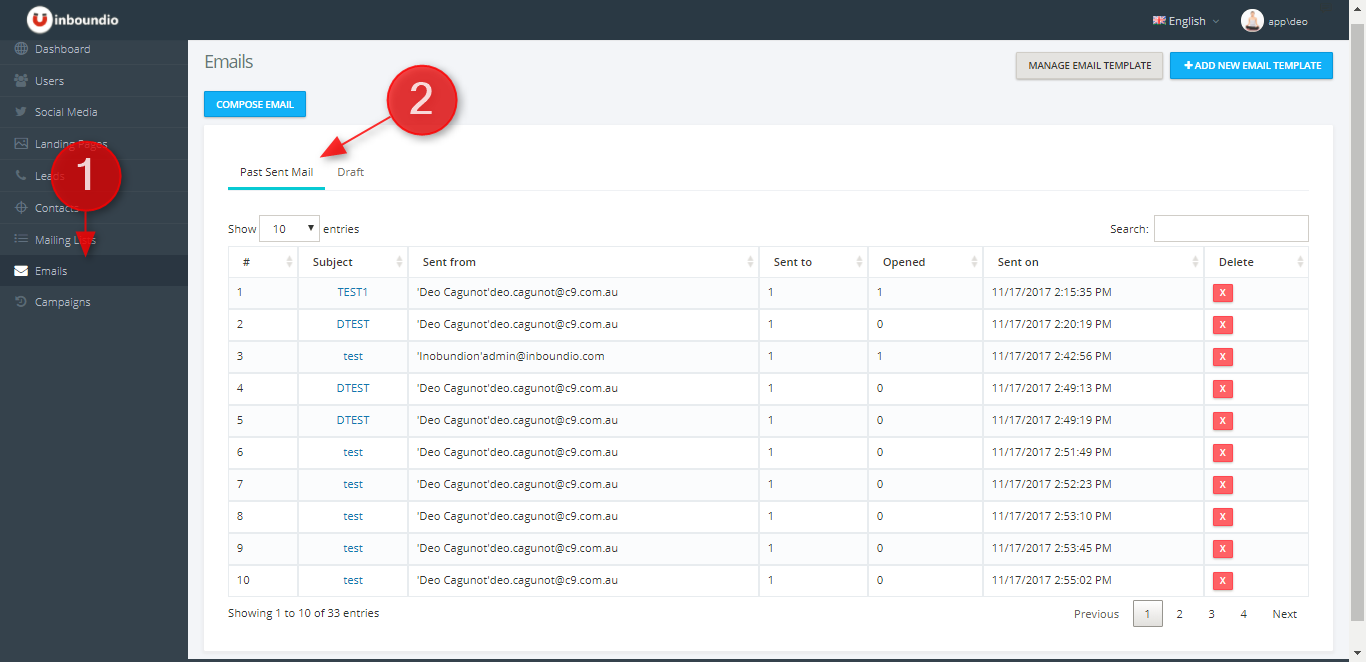
  1. Navigate to the "Emails" area from the left hand menu.
  2. The grid presented contains a list of past emails where you can view some metrics on your past emails and view a preview of the email sent

View Draft Emails

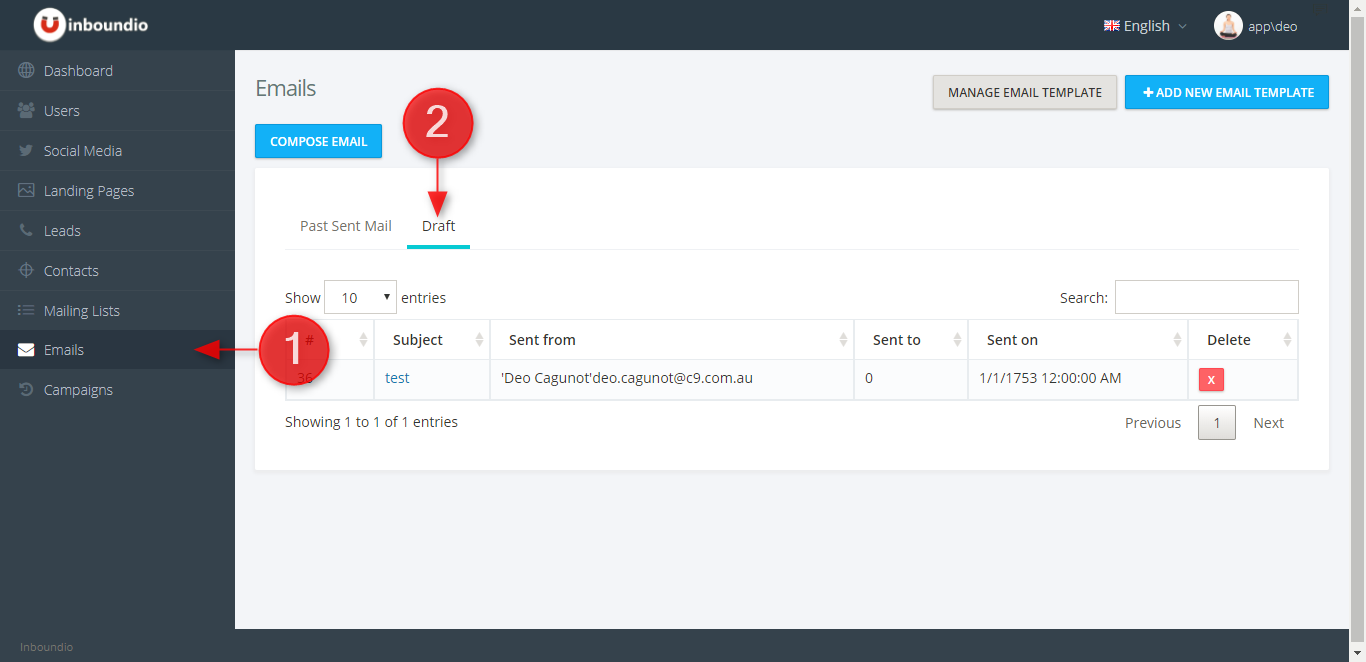
When an email is saved but has not been sent it becomes a draft email

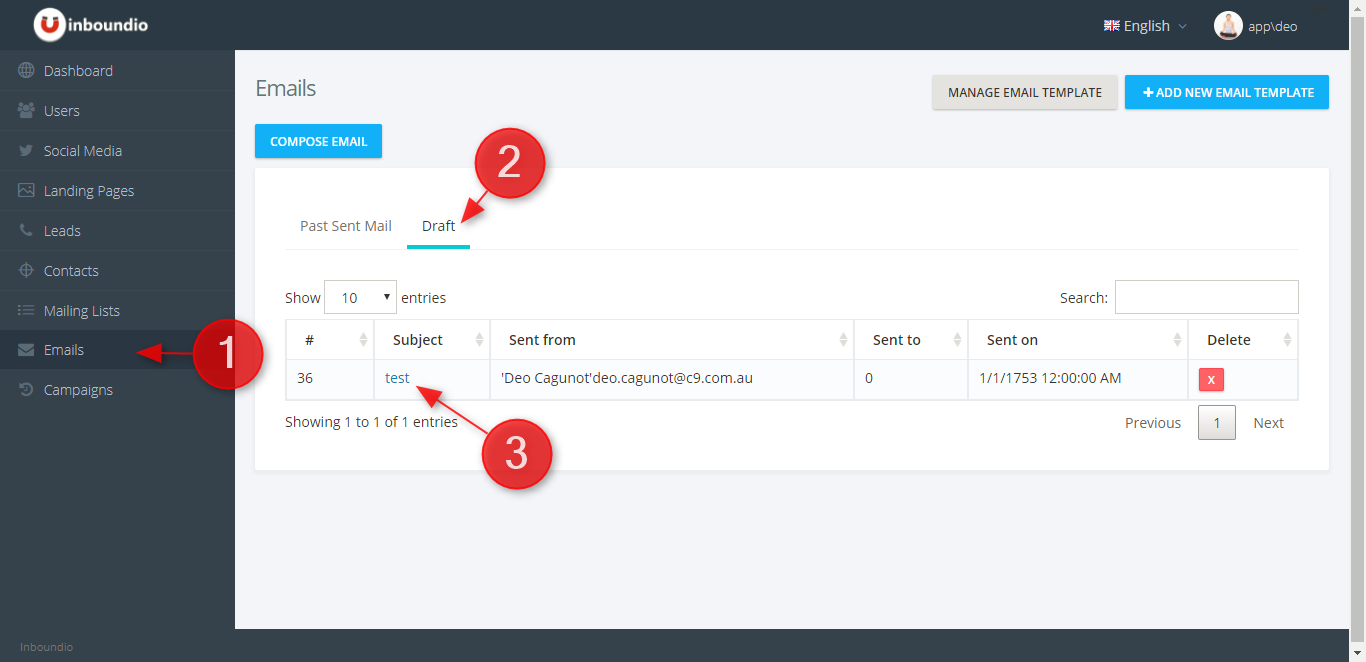
To view draft emails:

  1. Navigate to the "Emails" area from the left hand menu.
  2. Select the "Draft Emails" tab
  3. The grid presented contains a list of draft emails where you can edit or delete the draft email

Creating Emails

To create an email that can be saved as a draft or sent immediately:

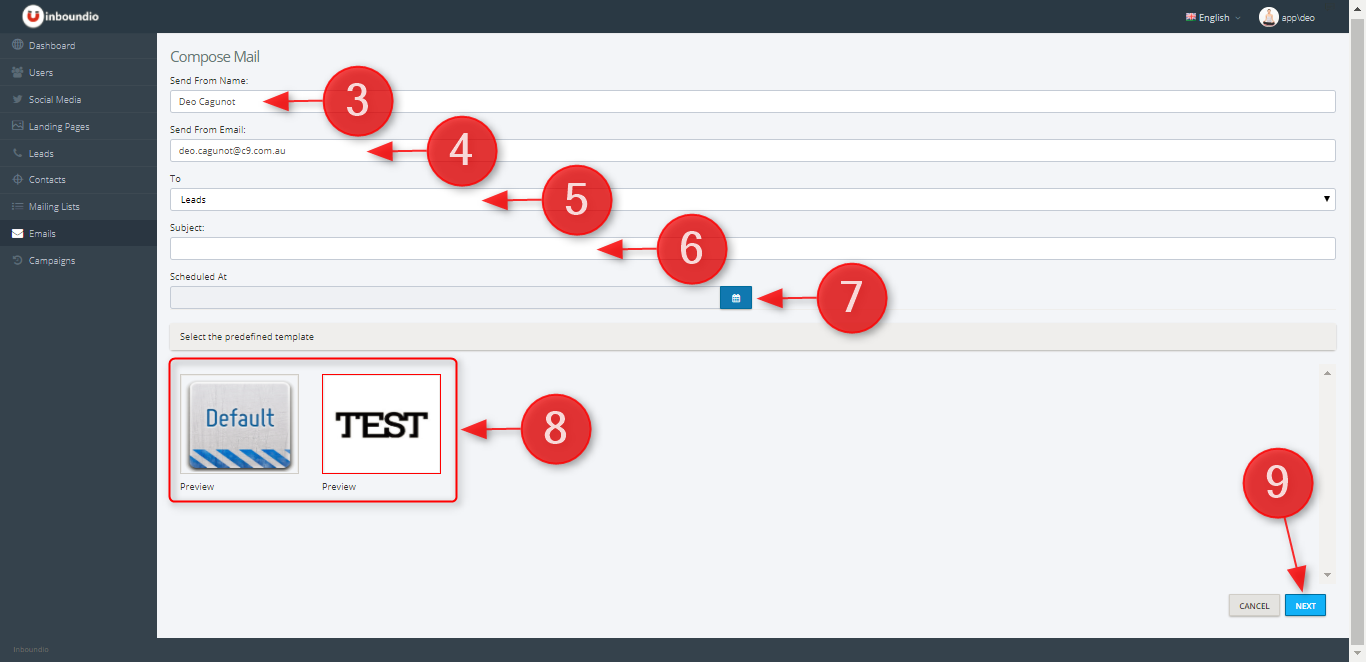
  1. Navigate to the "Emails" area from the left hand menu.
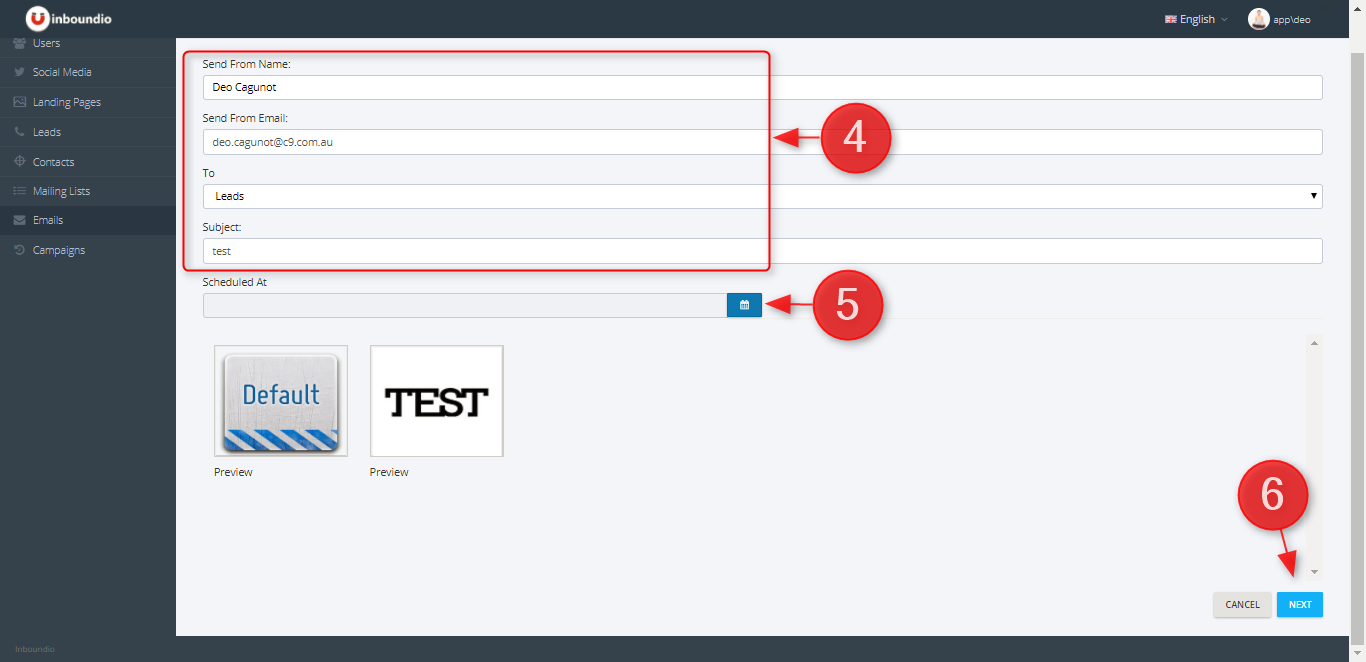
  2. If you have email quota available you will see a compose email button at the top of the screen, click "Compose Email"
  3. Enter the senders "From Name", this will appear in the "From" field in the recipients email program
  4. Enter the "From Email", NOTE: if you use an invalid email your email is more likely to be treated as spam
  5. In the "To" drown down select the mailing list you wish to send an email. If you don't have any mailing list with contacts associated you will need to set these up prior to sending emails
  6. Enter a "Subject", HINT: ensure you don't use subjects words that are commonly used in spam emails Google Search "common spam subject lines" for more information
  7. Optionally enter a scheduled date/time you wish to send the email
  8. Select a template to base your email off by click on the image of the email template.
  9. Click next button
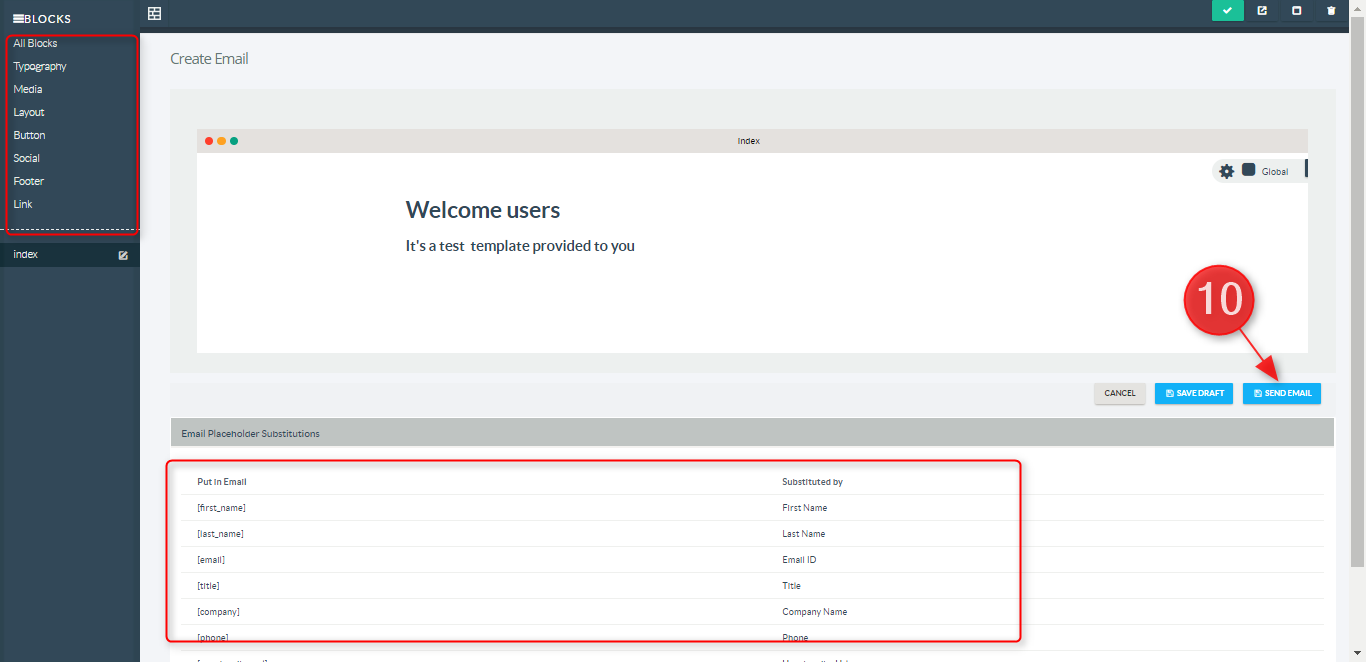
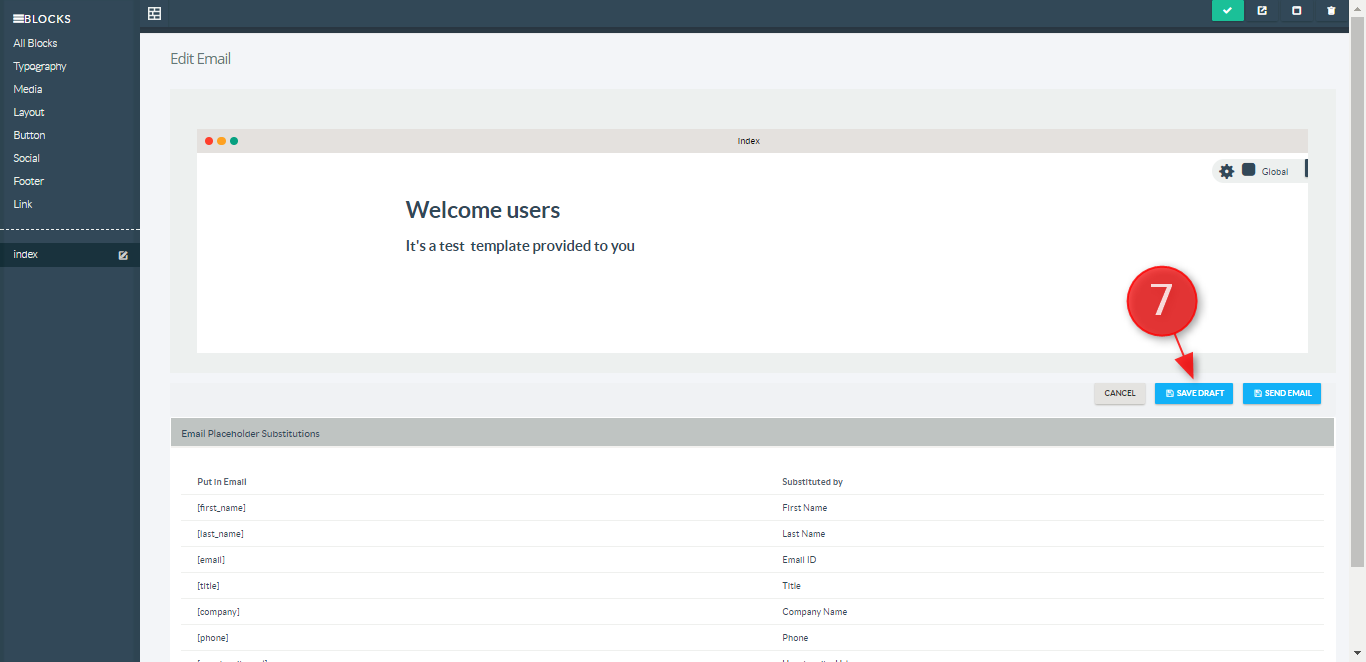
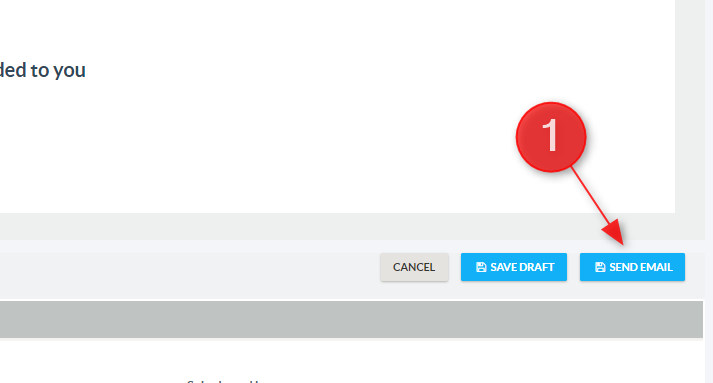
  10. You may now customize your template by adding blocks in the left hand side. You could also insert some tokens that is located at the very bottom. Then click Send email button


Editing Draft Emails

To edit a draft email:

  1. Navigate to the "Emails" area from the left hand menu.
  2. Click on the "Drafts" tab
  3. Click on the "Subject" text for the email you wish to edit
  4. Edit as desired
  5. Optionally enter a scheduled date/time you wish to send the email
  6. Click next button
  7. Choose to send the email by clicking the "Send Email" button or save a draft by clicking the "Save Draft" button


Removing Emails

You are able to remove both past sent emails and draft emails in the system

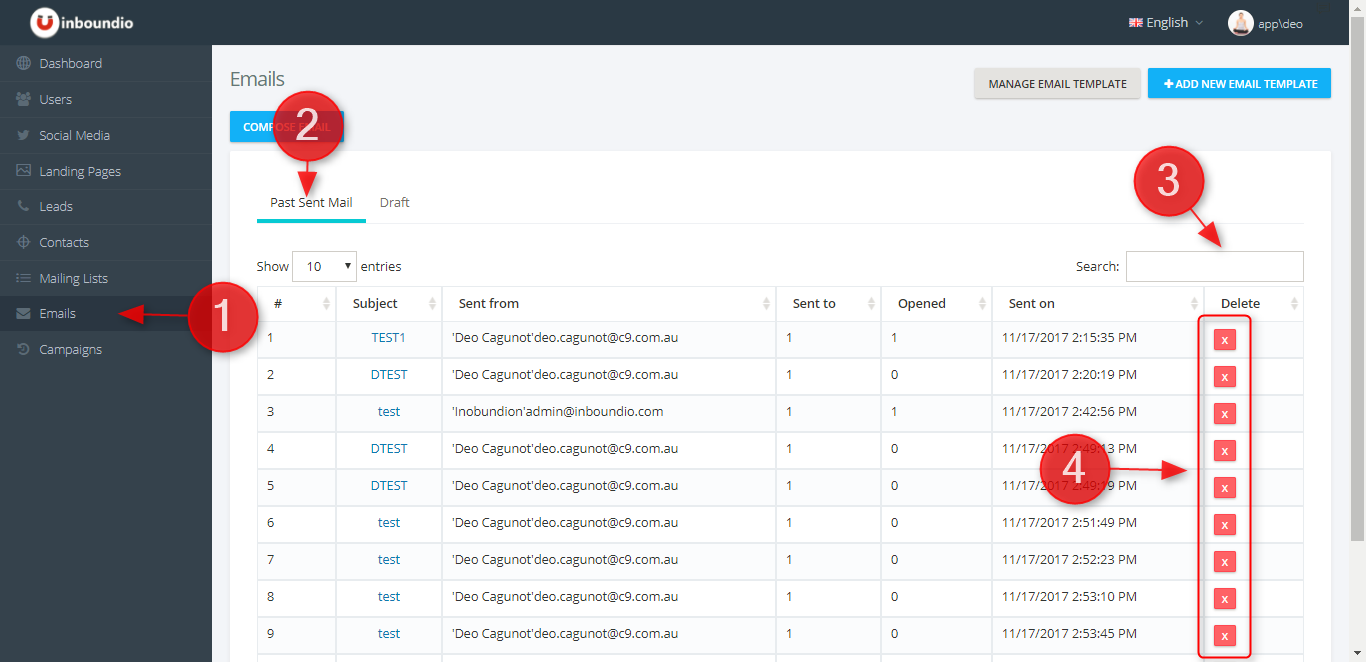
To remove a past sent email:

  1. Navigate to the "Emails" area from the left hand menu.
  2. Make sure you are on Past Sent Email Tab
  3. Search and locate the mailing list you wish to remove
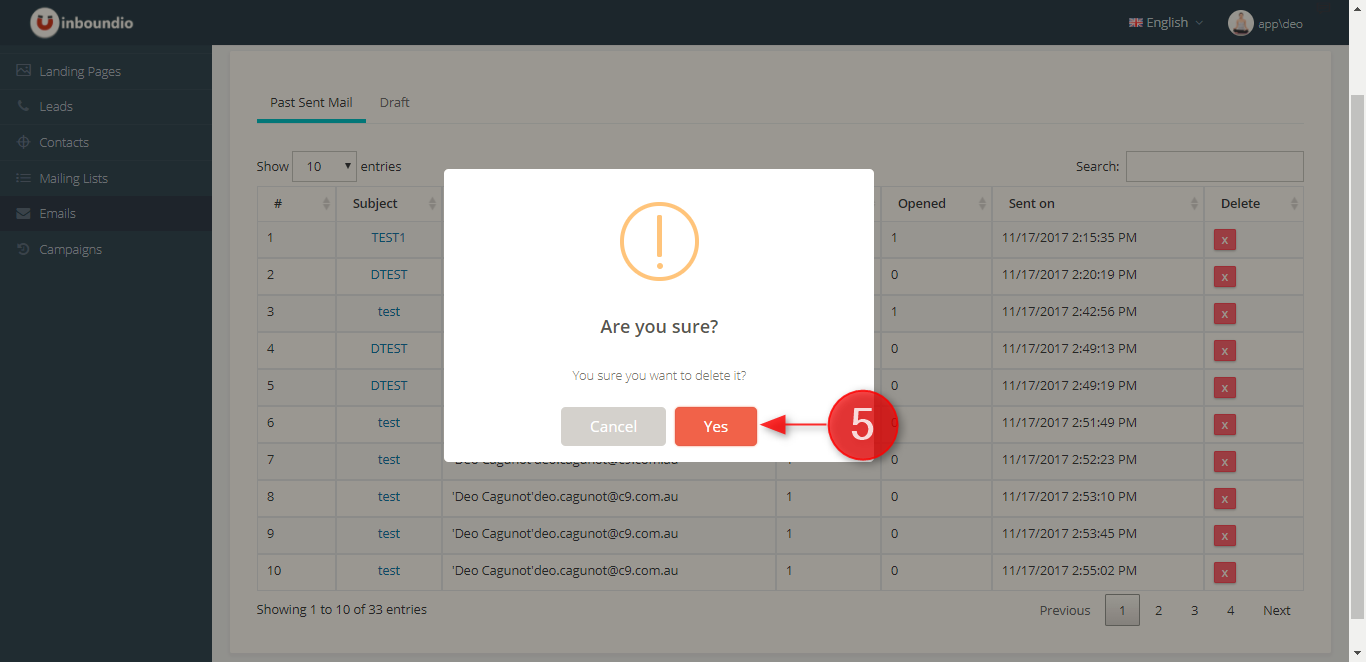
  4. Click on the "Delete" icon in the row of the past email you wish to remove
  5. Confirm the deletion in the confirmation dialog

To remove a draft email:

  1. Simple use the steps on Past Email except for number 2 make sure your on Draft Tab

Sending Emails

You are able to send completely new emails or draft emails

To send a new email see Creating Emails

To send a draft email see Editing Draft Emails and then simply send or schedule and send your email.

Email Templates

Email templates allow you to create a template once and then apply that as the base template to all future emails to ensure consistency in your marketing.

Email templates can be setup by your administrator or you can setup your own. It is typically best practice to ensure that your emails will look and convey message without any images as often email clients will block images and external content until the user allows them.

Create Email Templates

To create an email template

  1. Navigate to the "Emails" area from the left hand menu.
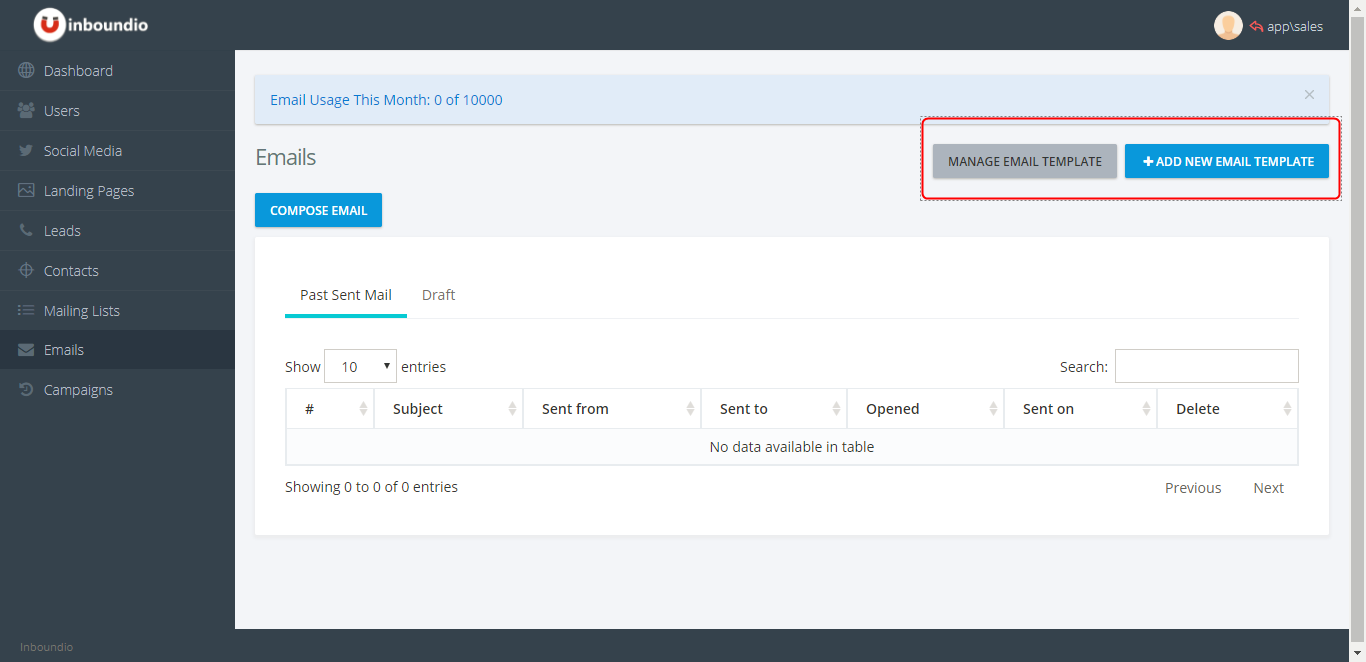
  2. Click on the "Add New Email Template" button from the top right of the screen
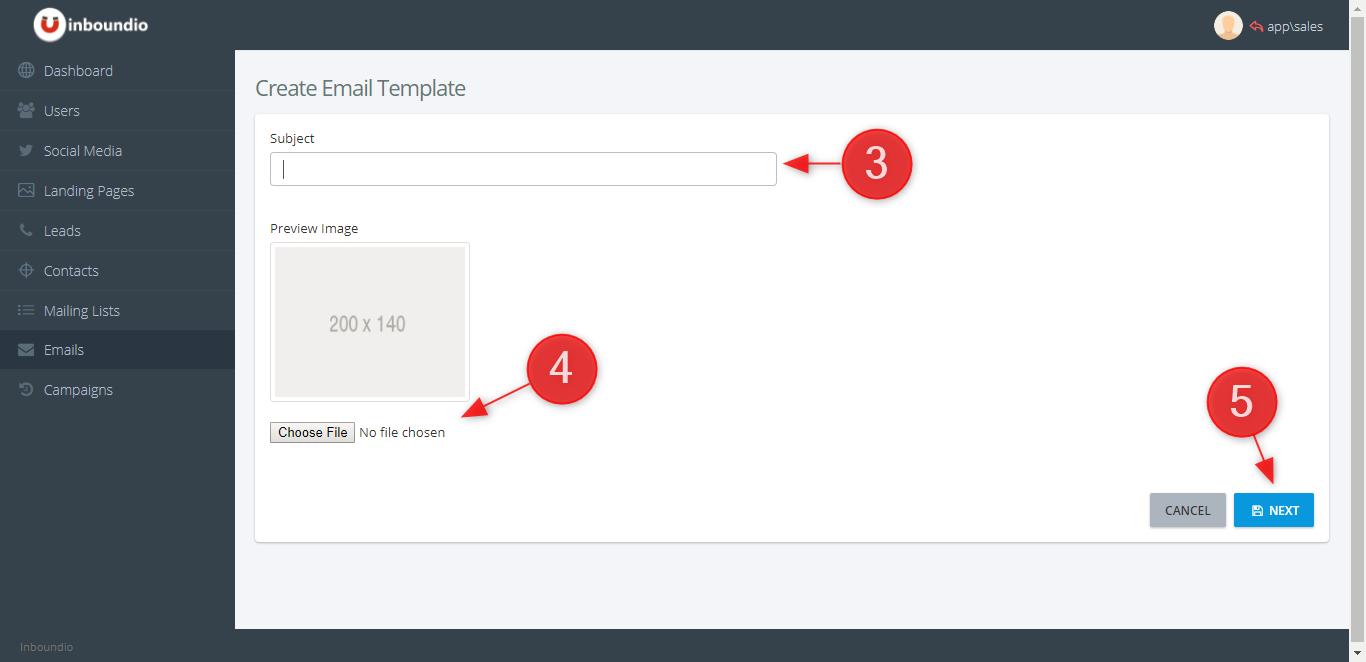
  3. Enter a "Subject" for the email template e.g. Company Name Monthly News
  4. Select a preview image to identify your email template, we recommend taking a screen shot of your completed template to use as the image
  5. Click "Next" button then it will bring you to next step
  6. Click on the toggle icon. It will show different type of blocks that you can drag onto the canvas. Create the body of the email template using Email Tokens where desired. Make sure you include the Unsubscribe email token at minimum that is available in the list of blocks. It helps to know HTML to customize your email templates and if you do not feel comfortable we recommend contacting your administrator or web developer to obtain a price for creating one for you.
  7. Click "Create Email Template"


Email Tokens

There are a number of tokens that you can use in your emails and email templates that will be substituted when an email has been sent E.g. to insert a person's first name place the [first_name] token into your email or email template.

A list of the available tokens are below:

Put in Email
[first_name]
[last_name]
[email]
[title]
[company]
[phone]
[unsubscribe_url]
Substituted by
First Name
Last Name
Email Address
Title
Company Name
Phone
Unsubscribe URL

Campaigns

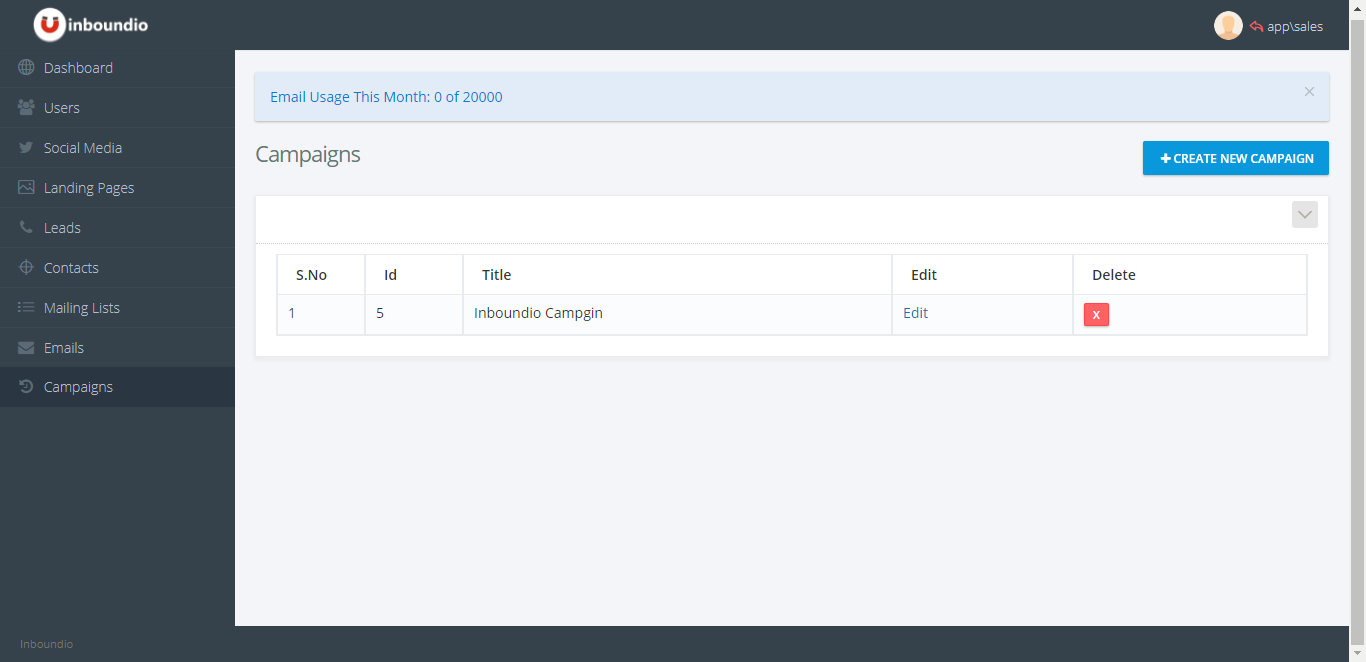
Manage Campaigns

Campaigns are used in your marketing work flow to automate your marketing efforts by sending automated emails either on the completion of filling out landing page forms or at a scheduled number of days after a form being filled out. You can also use the autoresponder area to send email to lists however we recommend doing this through the Emails area.
Create Campaigns

To create Campaigns linked to a landing page (so emails will be sent to those who fill it in) select that landing page. If you don't want to use any landing page, you can send emails to your email list too by selecting the email list/leads status

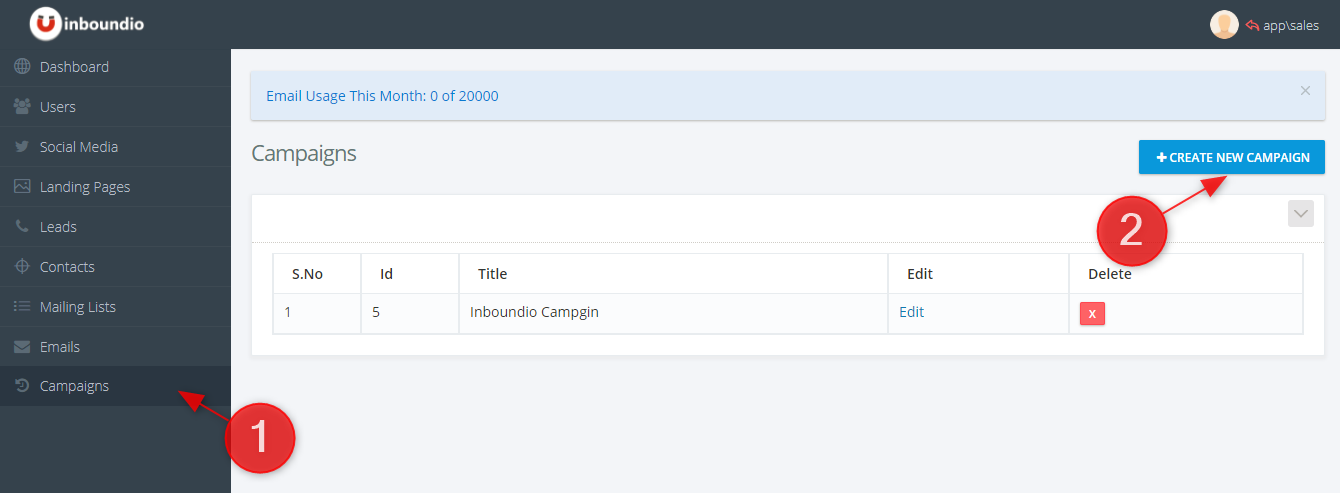
  1. Navigate to the "Campaigns" area from the left hand menu
  2. Click the "Create New Campaigns" button
  3. Give the subject to the campaigns email
  4. Select a Mailing List and Status group from the dropdown menu
  5. Select the day on which you want to send the emails e.g. 7 days after they first fill out the landing page form, this can also be used to send out an email to a certain lead status type email lists every n number of days
  6. Select a Campaign email you want to include. You can also create a new one by clicking Create Campaign Email button
    Don't forgot to enter On Day
  7. Save the campaign by clicking the "Create Campaign" button

Edit Campaigns

To edit an campaigns:

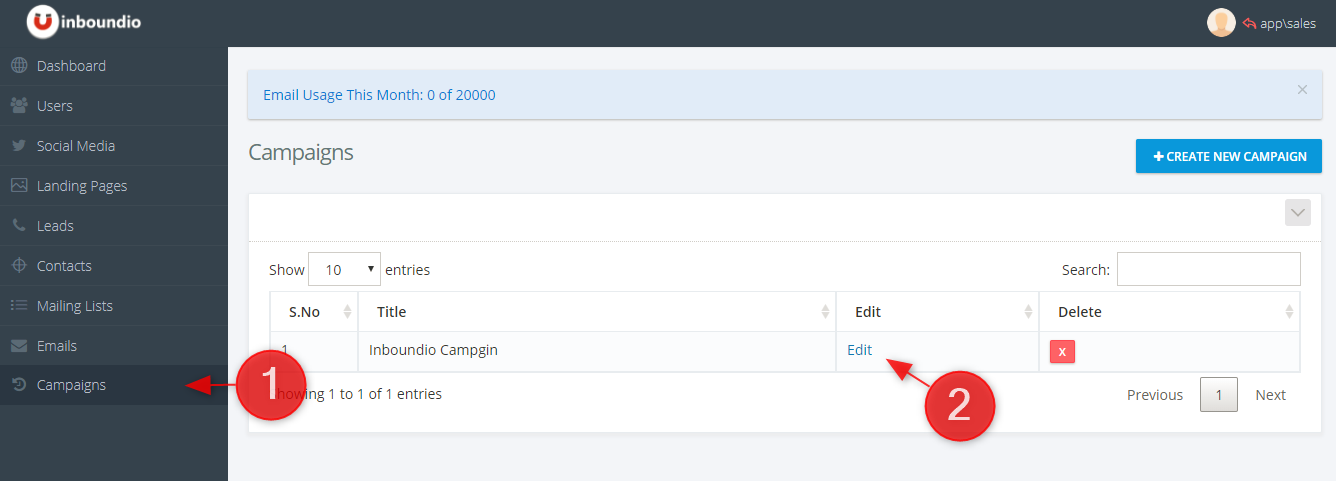
  1. Navigate to the "Campaigns" area from the left hand menu
  2. A grid of campaigns will be displayed, Click the "Edit" button in the row of the grid you wish to edit
  3. Make changes click the "Update Campaign" button at the bottom

Remove Campaigns

To remove an campaigns:

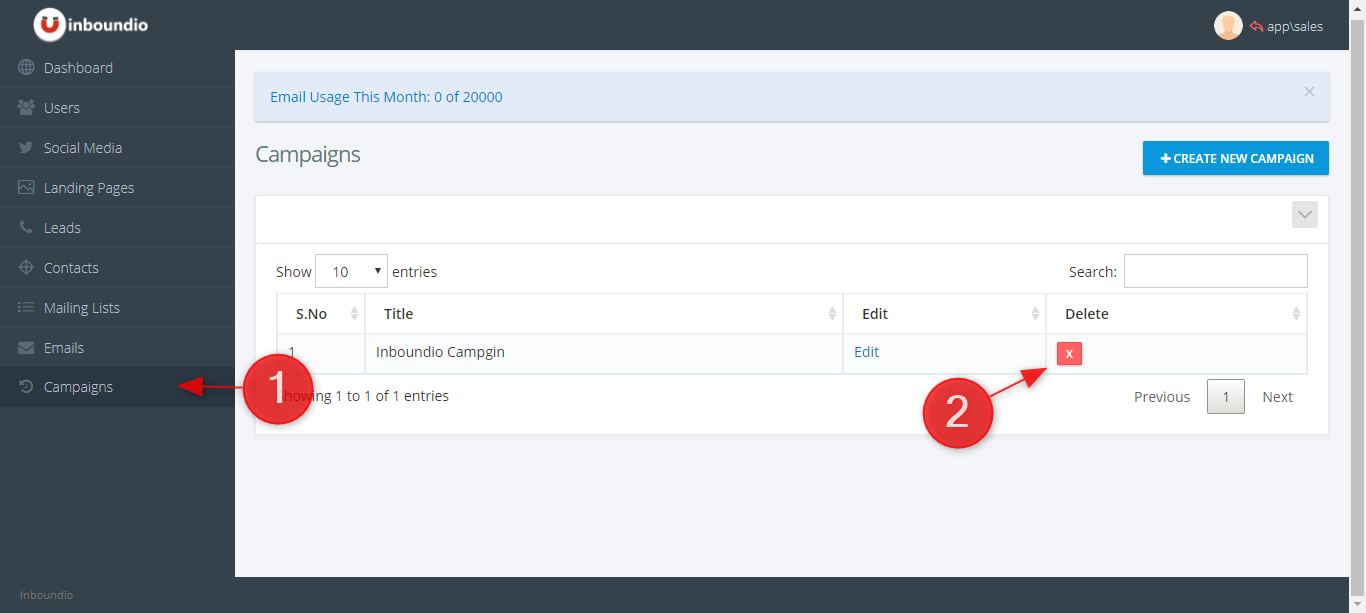
  1. Navigate to the "Campaigns" area from the left hand menu
  2. A grid of campaigns will be displayed, Click the "Delete icon" button from the Delete column in the row of the grid you wish to delete
  3. Confirm the removal

Campaigns Email Templates

Campaigns templates are "Email Templates" and managed through the Email Templates area

Support

Contact your administrator for support via the channels provided to you on sign up.